Purchase Orders
5. Creation and Management of PO types
(Would like for the system to allow for Inventoriable goods Consumable (Non inventory Goods) Services(Utilities,Lawn, Lights, Etc)
Inventory
To Purchase Inventory you have to create Purchase Orders and SIPL from the system.

Services
You can create Vendor P.Os in two ways.
I. Create Vendor P.O from the Sale Order.

Select the Service in the Service line Drop down, and enter the Quantity and Amount and then click on Save & View Vendor PO.

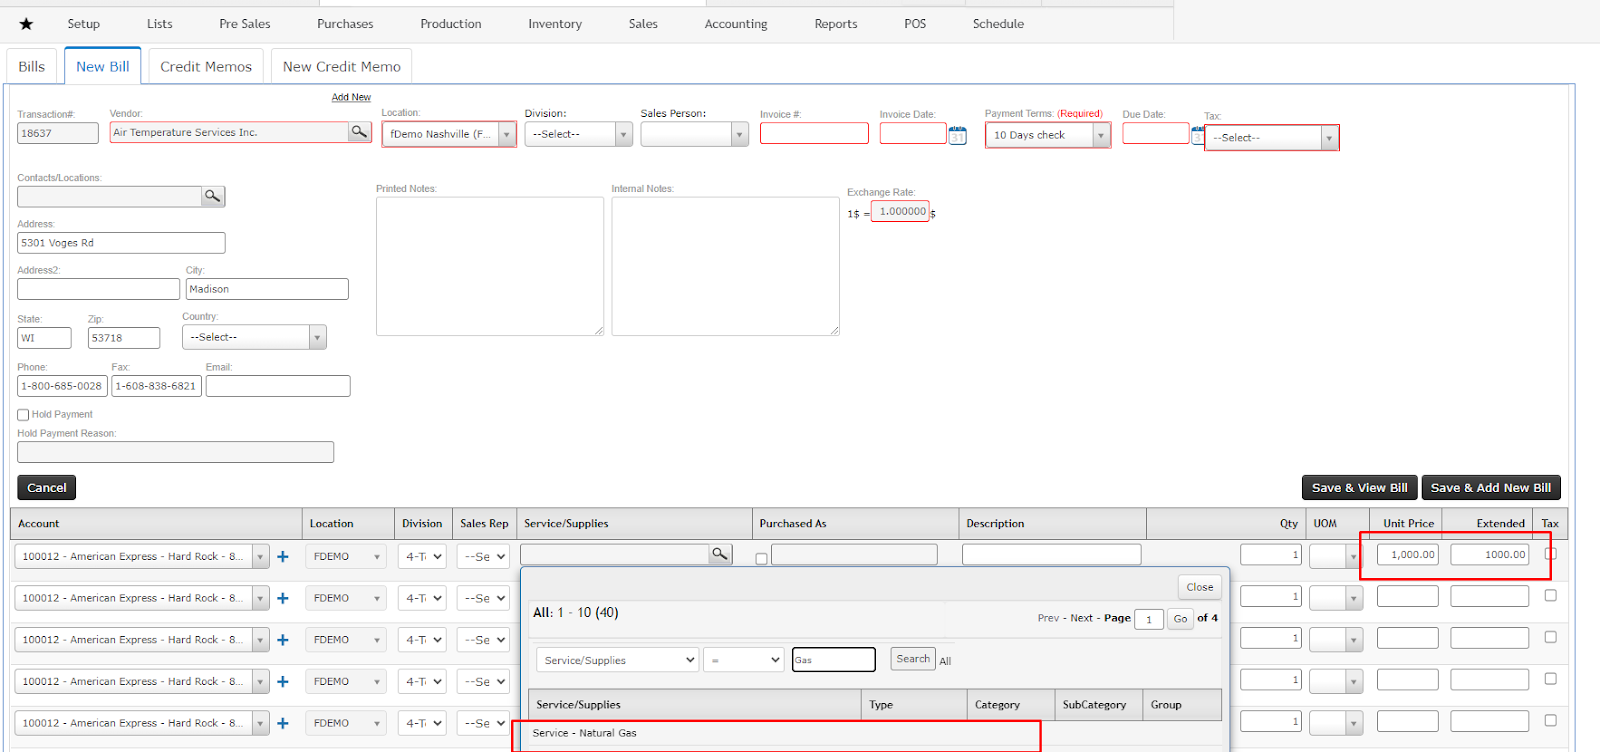
II. To purchase services create Vendor PO and generate Bill from the created Vendor PO
To create Vendor PO : Accounting >> Payables >> + Vendor PO
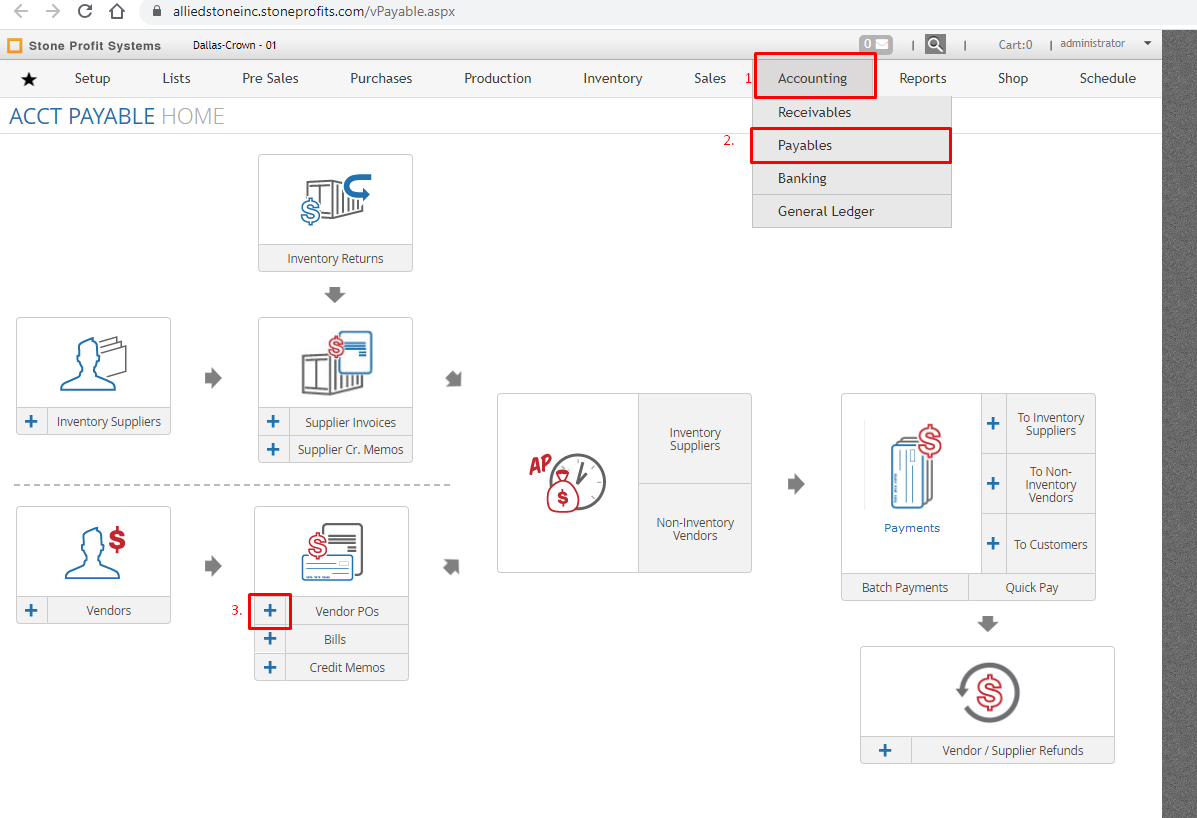
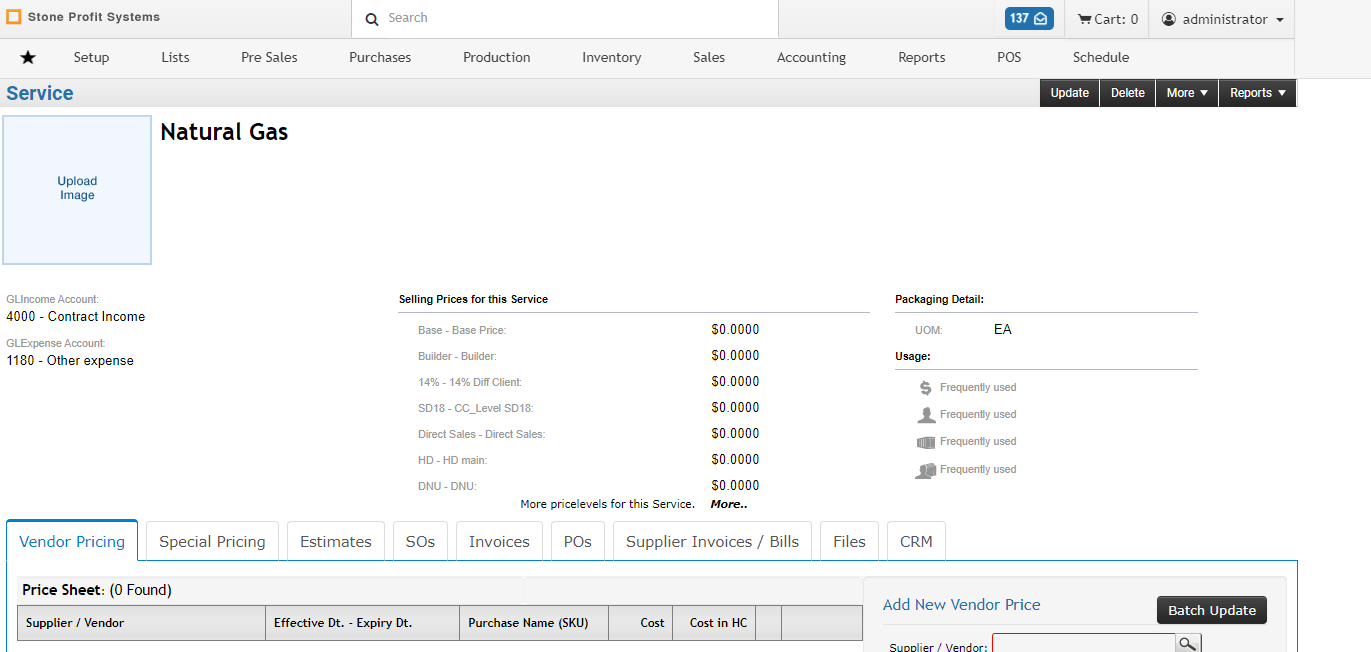
You can select any type of service from the selection list.
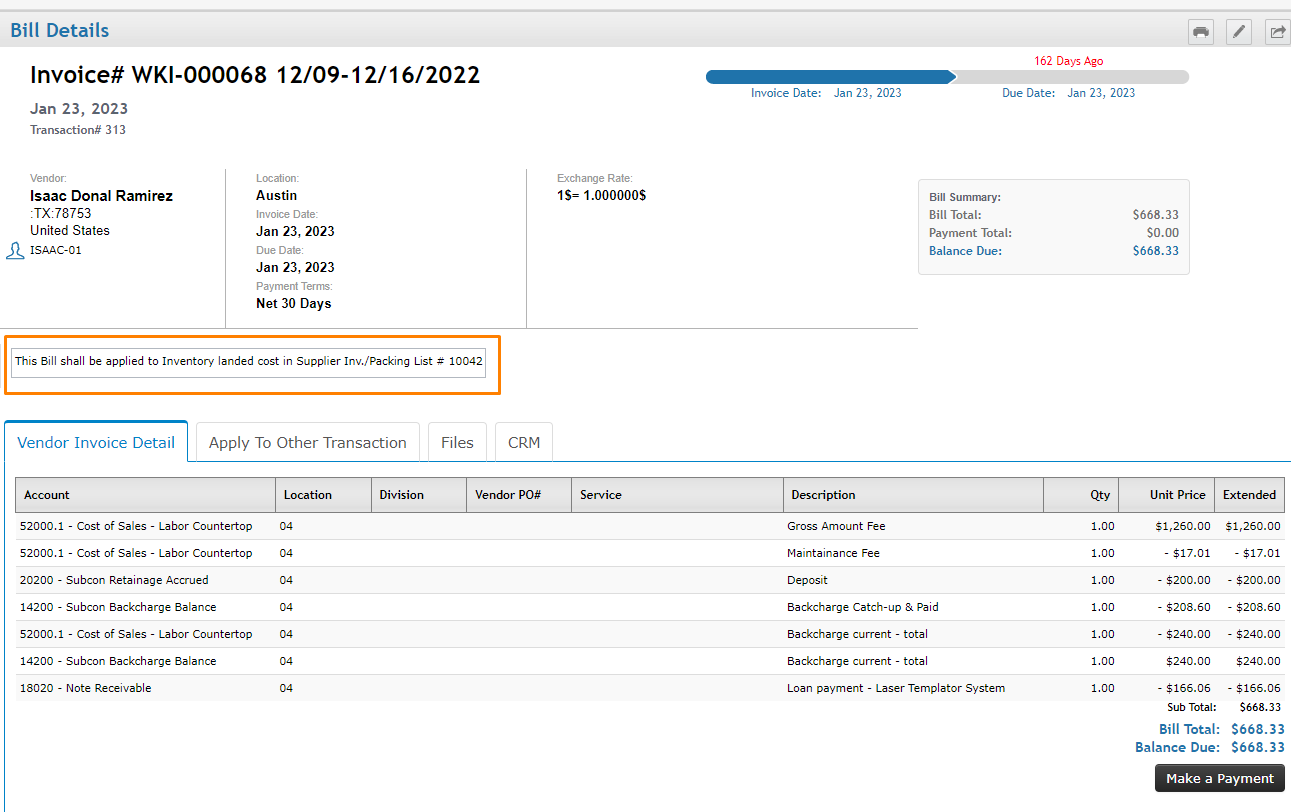
Once Vendor PO is confirmed and complete or when you receive bill from the vendor, create Bill from the Vendor PO by Clicking on Add New Bill button

Consumables (Supplies/Samples)
Consumables are called as Supplies in SPS
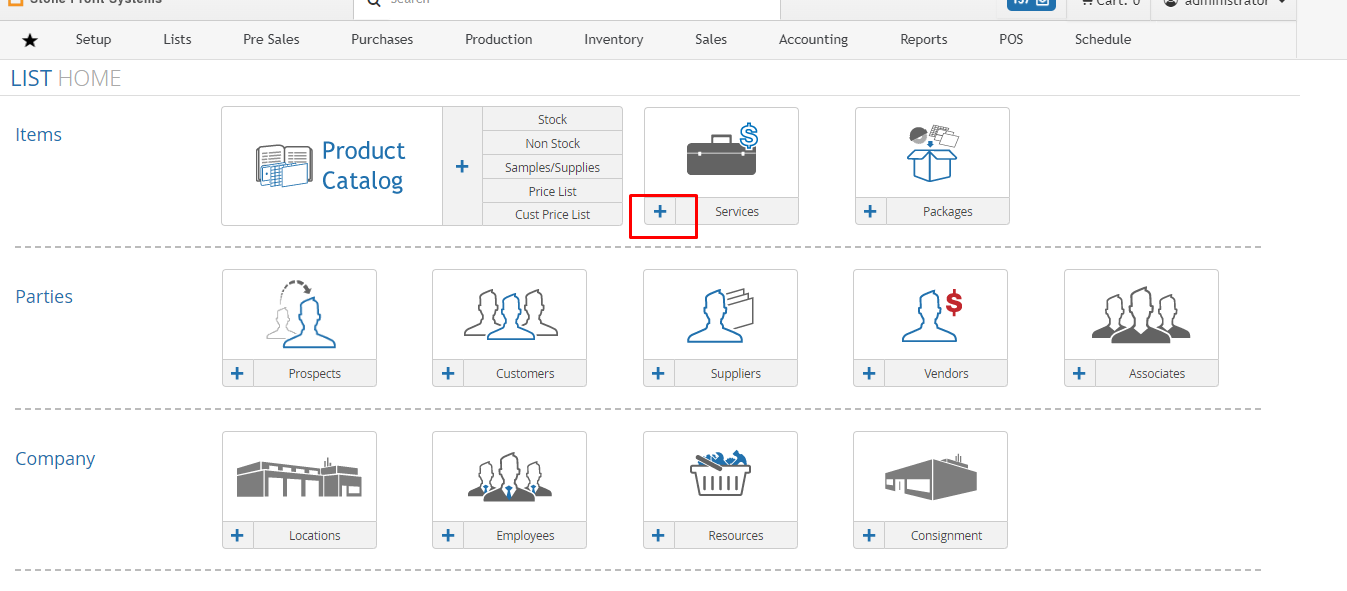
To Purchase Consumables first you should create Product as Supplies
Pick Kind as Supplies

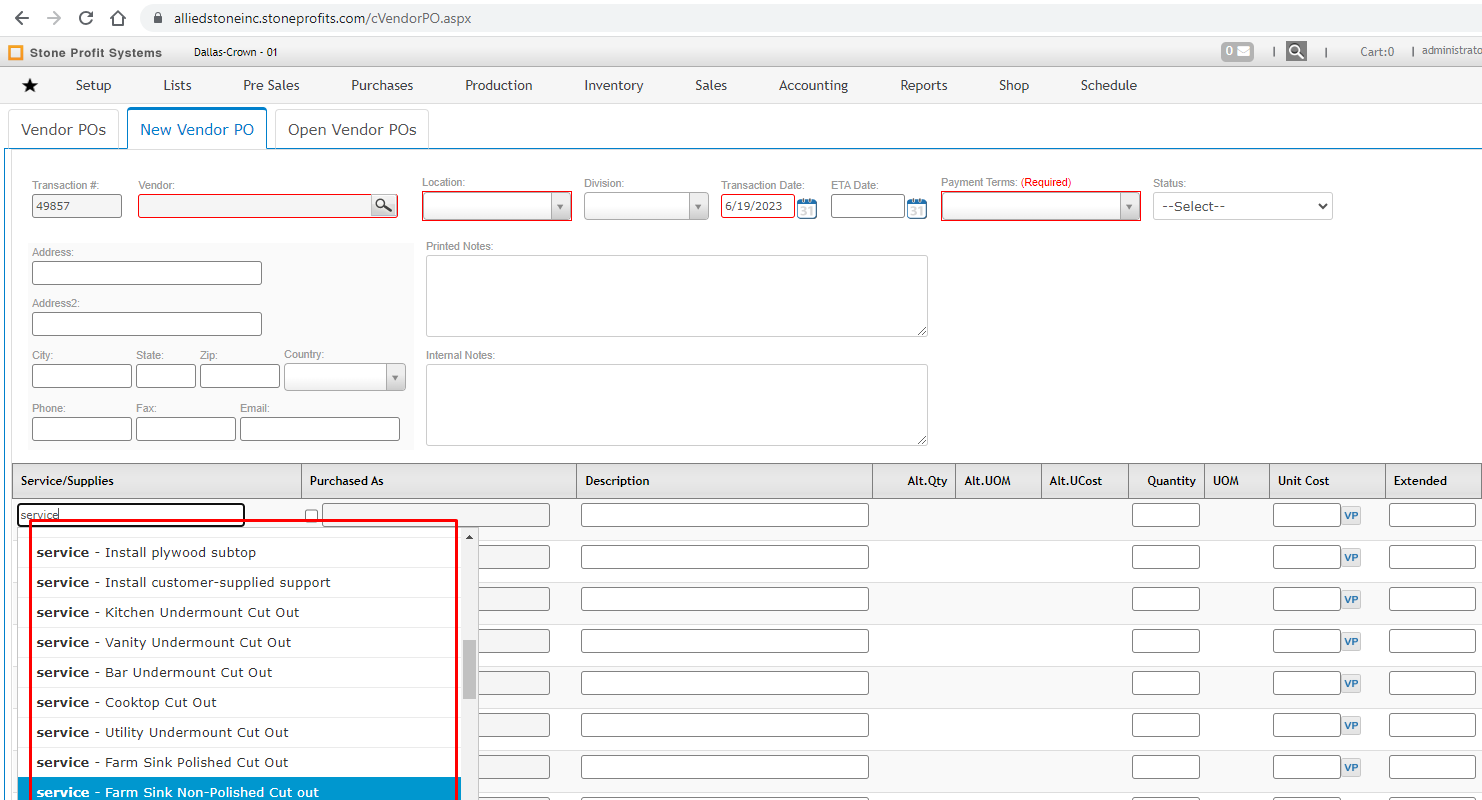
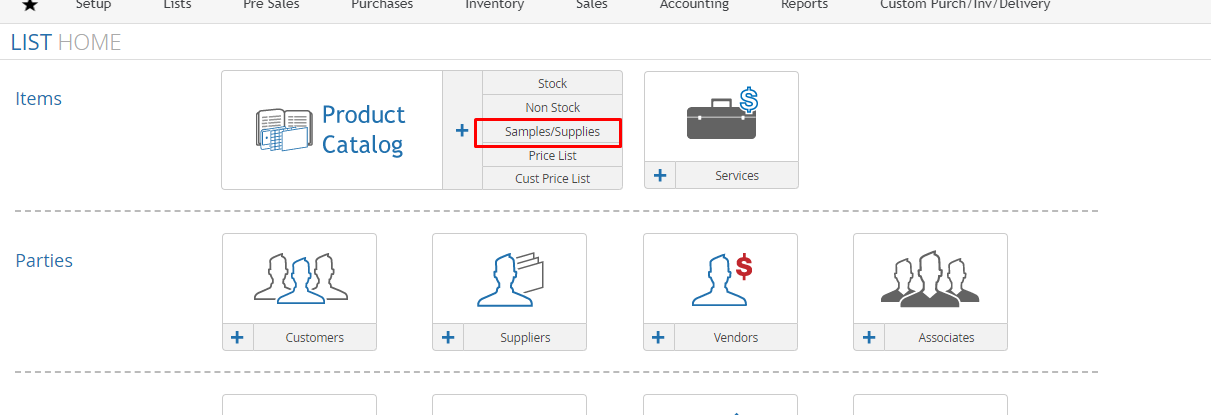
You can see all Supplies by clicking on Samples/Supplies section from the lists page

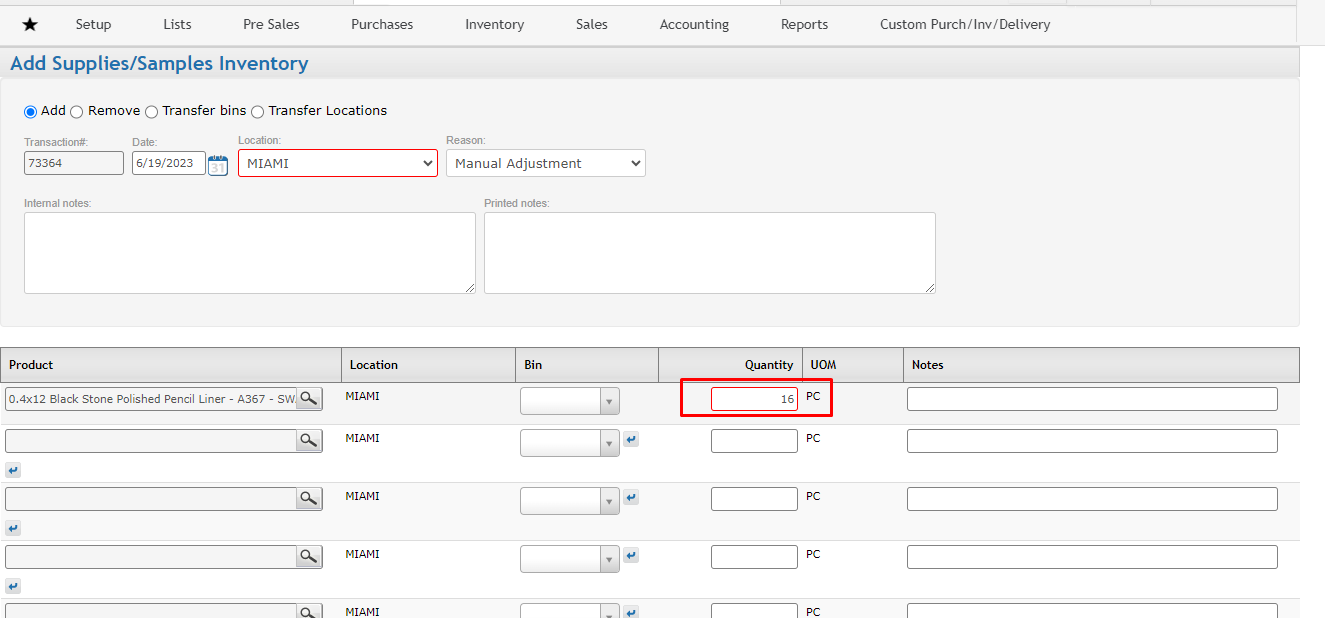
Left click on product it will give you the options to add, remove or transfer consumables from the inventory

By clicking on the “Add” button on the Supplies Detail page, you can enter supplies in to the system directly without any invoice.


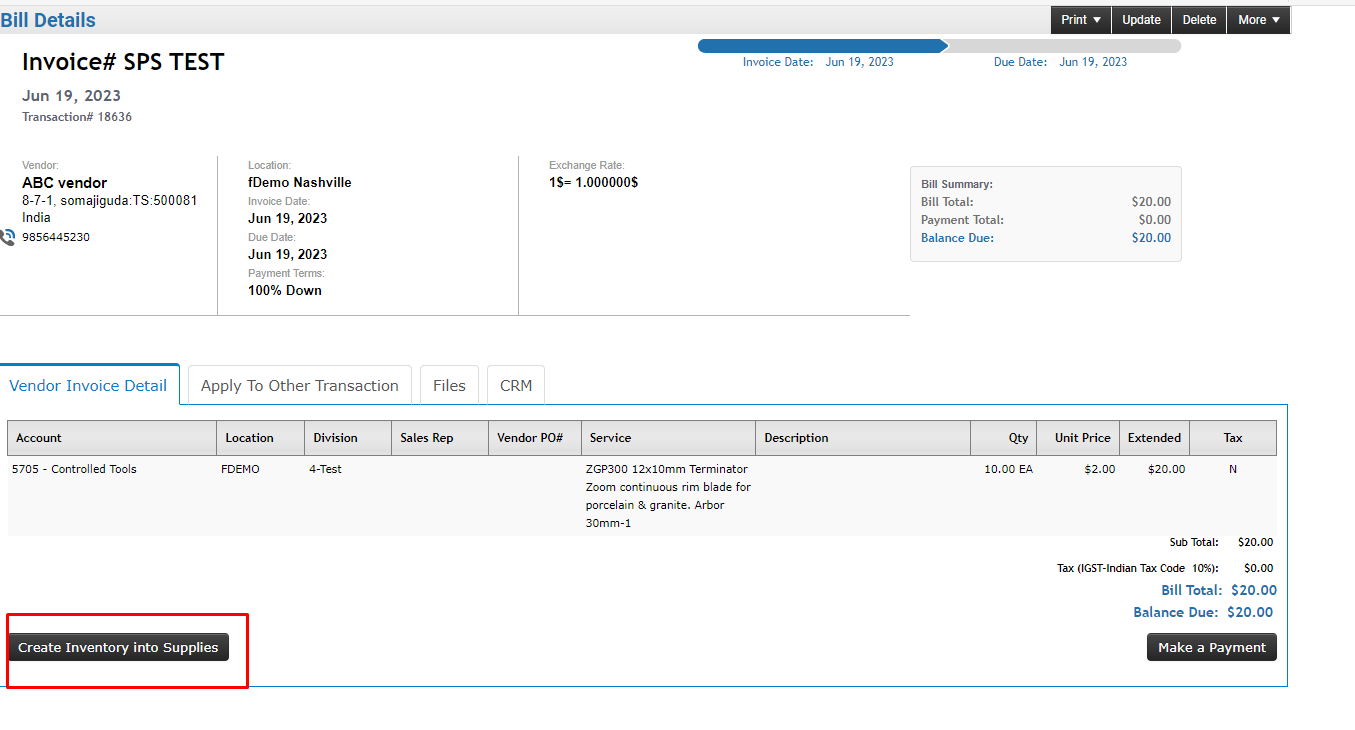
If you want to buy supplies from the vendor you should create Bill / Vendor PO with Bill
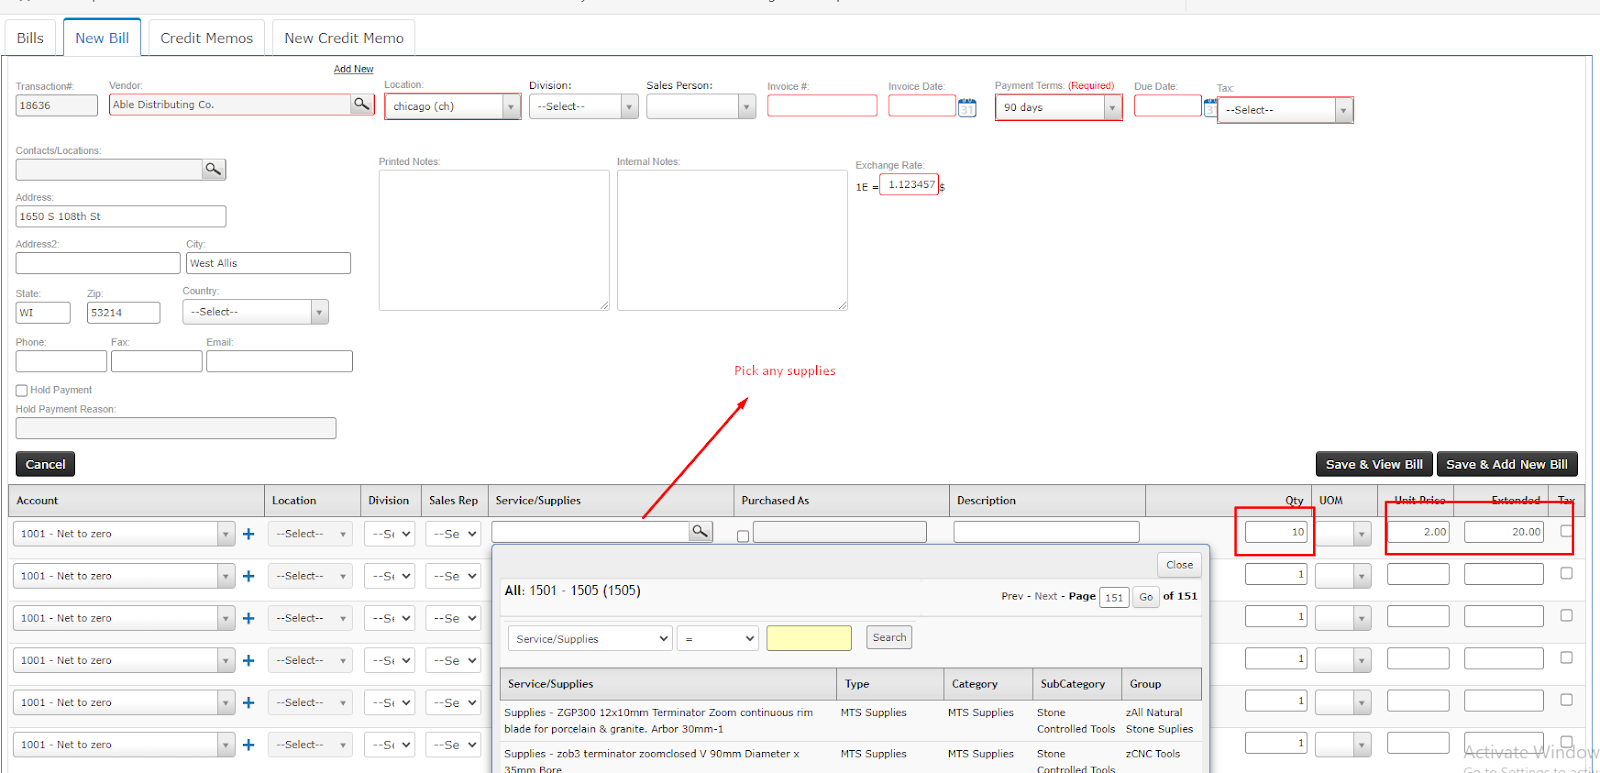
After creating a bill you should click on create inventory into Supplies if you want to add into the supplies inventory.

Click on Supply will take you to the Supply Page
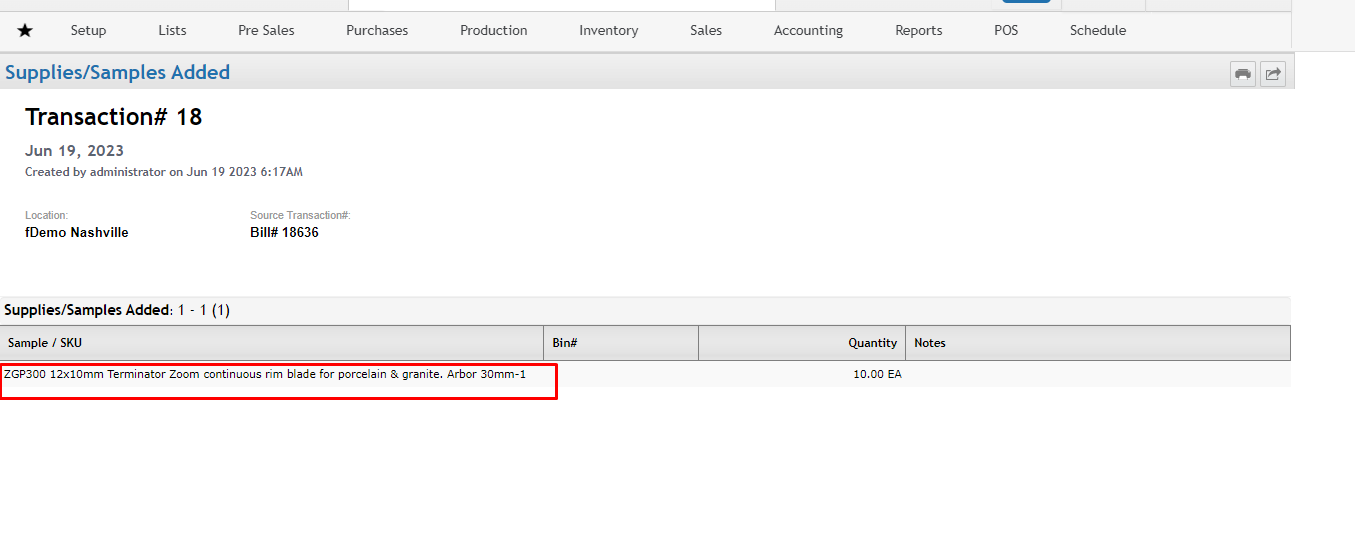
Here you can see the available inventory

If you consume supplies you can remove that inventory by clicking on the remove button

Enter the quantity and click on the save button will reduce the inventory.
You can transfer supplies from one bin to another and from one location to another location by using the Transfer Bins or Transfer Locations options.
Utilities
You should add Utility as a service in the system

You should create bill with this service
10. PO approval process/workflow (ability to self implement/configure when needed)
(Ability to approve PO by dollar value and other parameters)
Setting the limit to approve the purchase order based on User Group:
Setting up PO Limits by User Groups
Go to Lists -> Employees -> User Groups. Select the Edit icon of the user group you want to set the Purchase order approval limit.

Use the field “Approval Limit for Purchase Orders” to setup the limit of approval for a particular User group to approve Purchase Orders in the right pane.
Ex: The limit of $10,000 is set for the User Group then the user who belong to that group are eligible to approve the Purchase Order under or equal to $10,000.
Purchase Orders Locks:
When the Purchase order created has exceeded the approval limit, then the PO will be locked. Inventory receipt or Supplier invoice cannot be created until the Purchase Order is approved.

Approving Purchase Orders:
If the User with access and permission has the capacity, they can see the purchase order, which also shows the Approval Status, to approve the order.
If they click on Approve, then that Purchase order will be released and Inventory receipt and supplier invoice can be created.
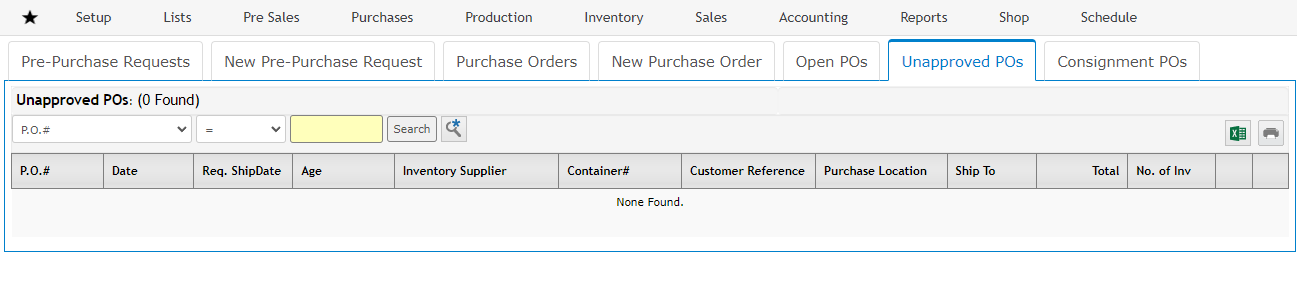
Unapproved PO’s List:
To see the list of unapproved PO’s go to Purchases -> Unapproved POs

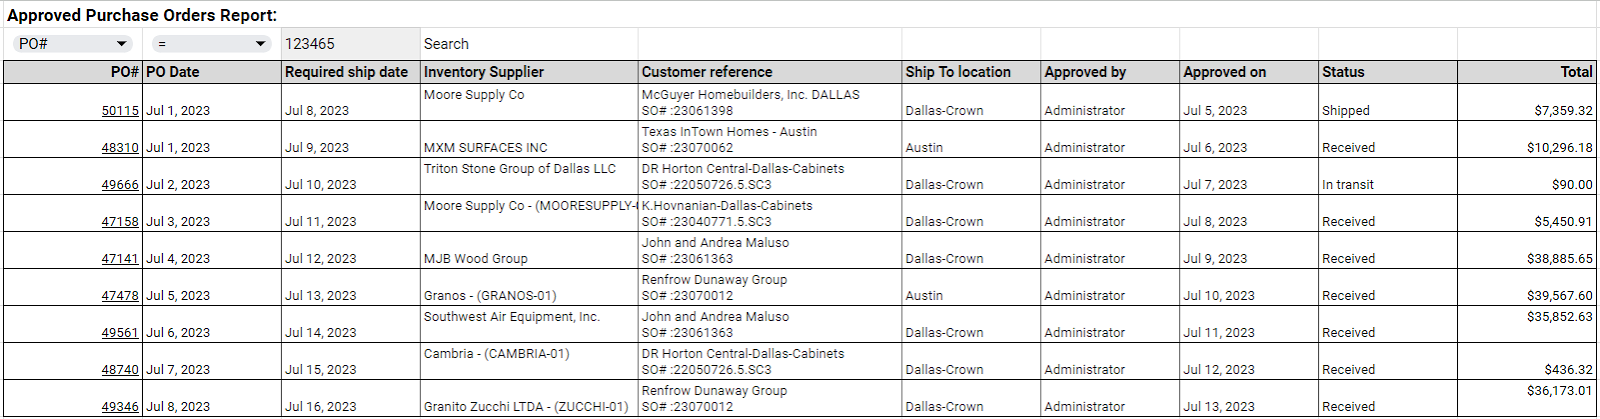
To see the log of approved PO’s: Reports -> End of Day / Month -> Purchase Orders - Approved Log

Approved Purchase Orders Report:
16. Blanket POs
(Ability to create a blanket PO, which allows the company to create a ongoing PO for a standing order or standing service over a period of time
Example - lawn service over the span of a year, a to be invoiced every 30 days, for $150 per)
We can achieve this by using a concept called Memorized Transactions in SPS.
For Ex:
There is a Vendor PO with a value of $1800.00. It will be worked over the span of one year.
This PO needs to be Invoiced on a Monthly basis for $150 per invoice for the whole year.
First you will create a Vendor PO.

You will create the First month bill manually.
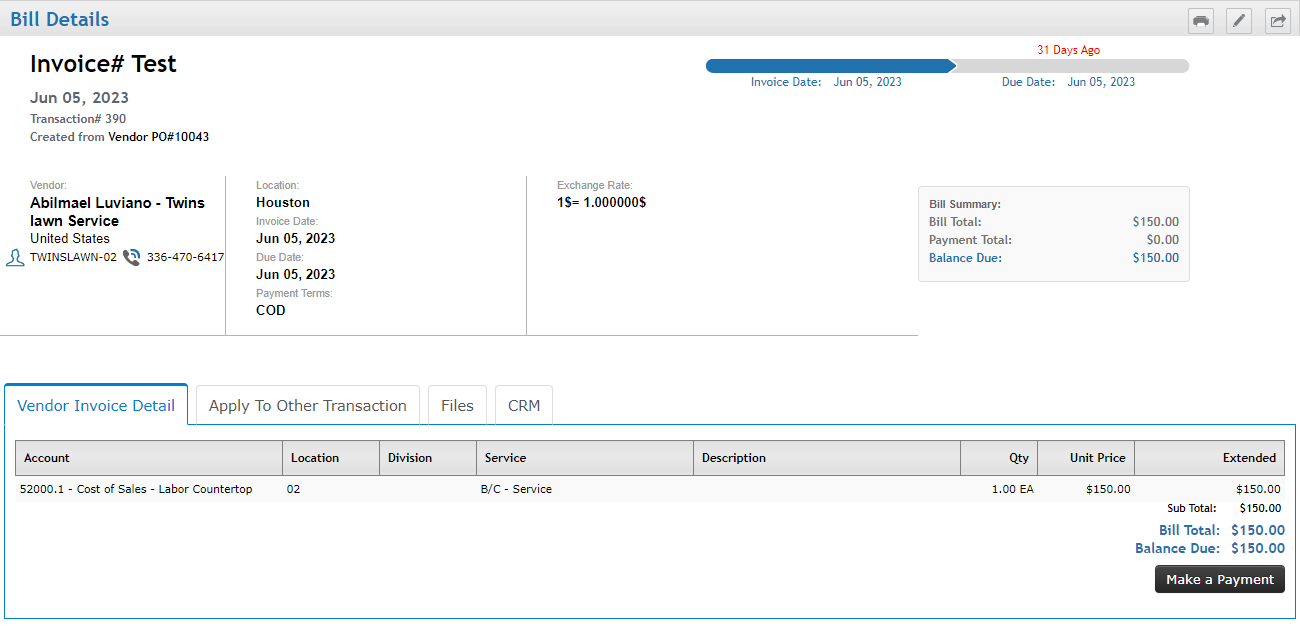
From the first bill, Mark it as Memorized Transaction.
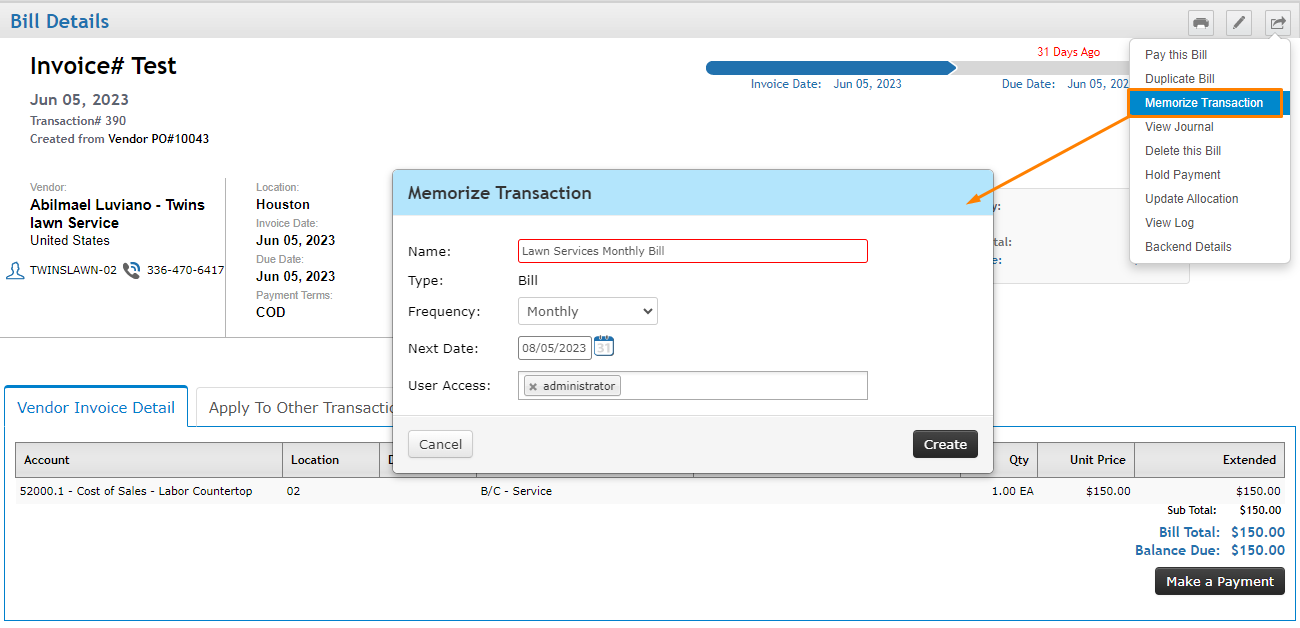
If the logged in user has access to the memorized transactions and the date of the Bill falls behind, it will redirect the user to the Memorized Transactions screen. It will auto select the ones that need to be created on that day or past the date. User has to click on Create Selected Transactions. Bills created will be linked to the associated Vendor PO. It will redirect the user every day till all the past due ones are created.


17. PO Releases
(Ability to create a PO release, defined as a set of terms over a period of time such as, We agree to by 1200 slabs over a period of a year, having a release of 100 every month, but only if the previous 100 have been delivered)
We can achieve this by using a concept called Memorized Transactions in SPS.
For Ex:
There is a Purchase Order created to buy 1200 slabs. This PO will be open over a period of a year.
100 Slabs will be delivered every month, but only if the previous 100 Slabs have been delivered.
Purchase Order created for 1200 Slabs on it.
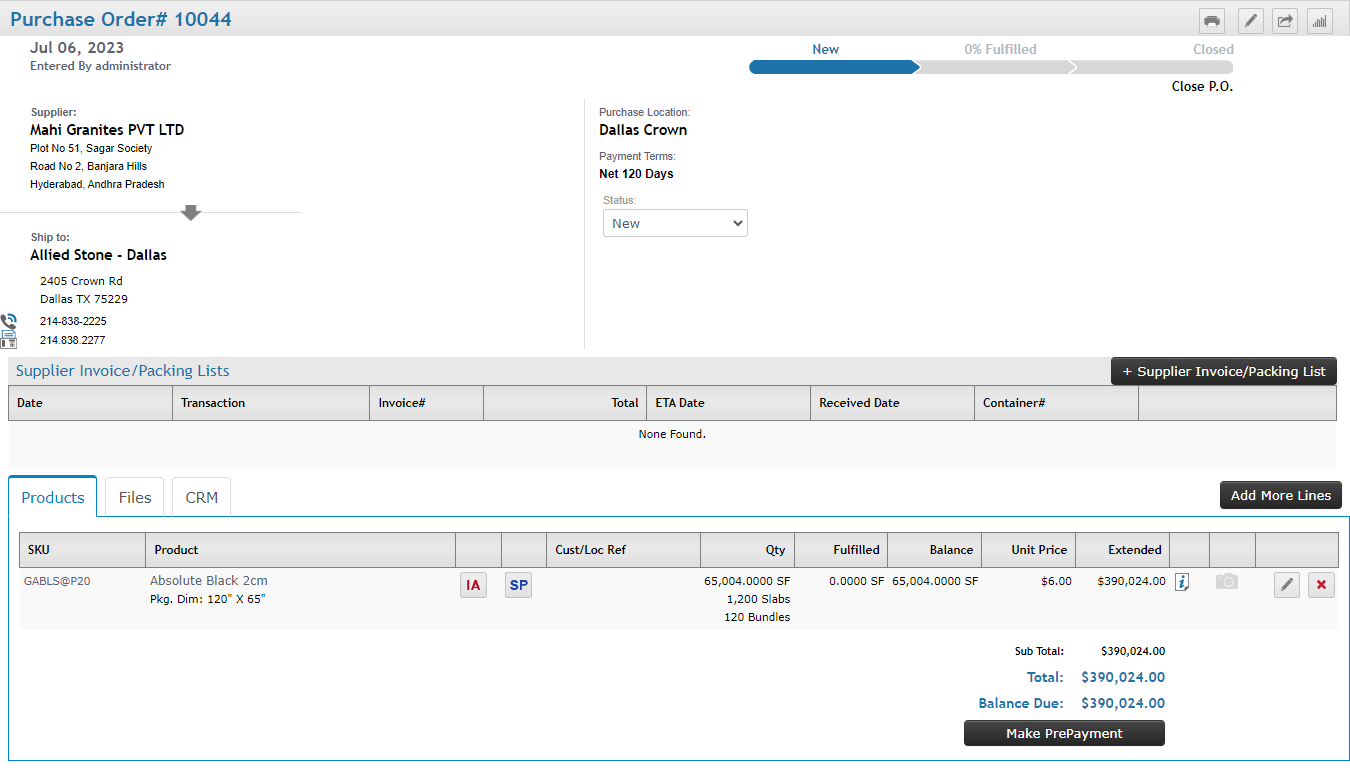
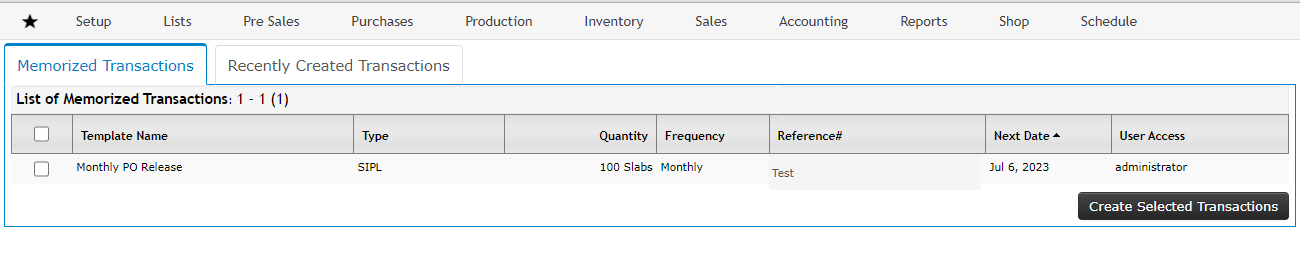
You need to create the first SIPL for 100 Slabs. Then from the More Actions, we have an option called Memorize Transaction.

Whenever you login into the system, it will show you the list of Memorized Transactions which are pending to create. Select that SIPL and Create Selected Transaction then it will create the SIPL and it will be linked to Purchase Order. It will show up every month until the connected Purchase Order is fulfilled.
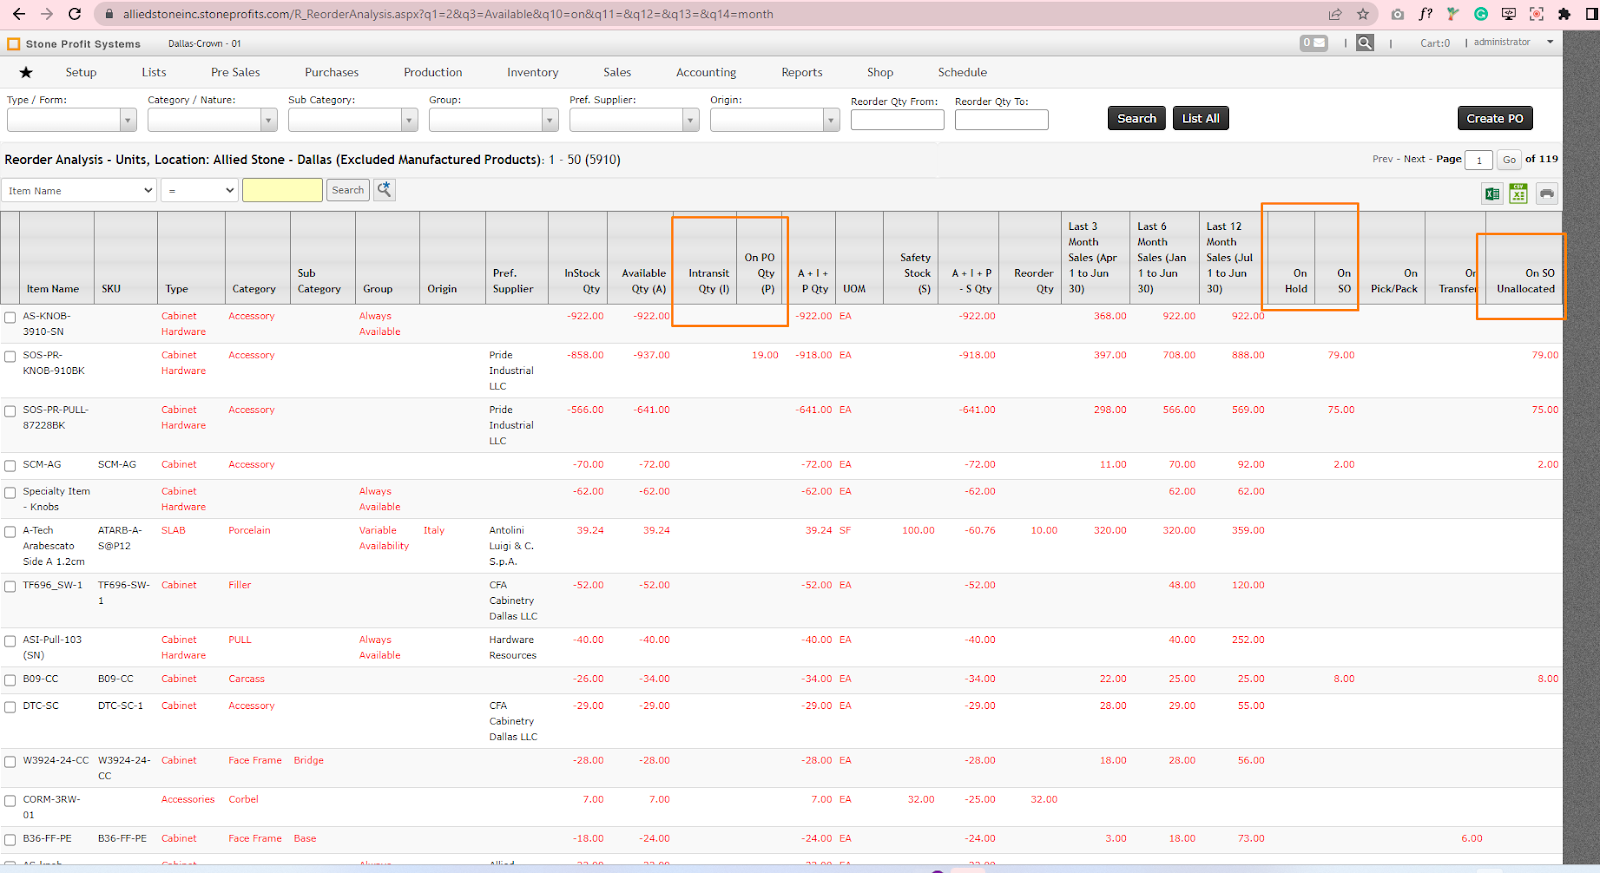
18. MRP
(Ability to snapshot inventory balance at any given time. Ability to compare Inventory vs In Transit vs On PO vs On SO to know current and future inventory level)
For this analysis you should enter Reorder quantity, Lead time and Safety Stock for each Product at product setup level
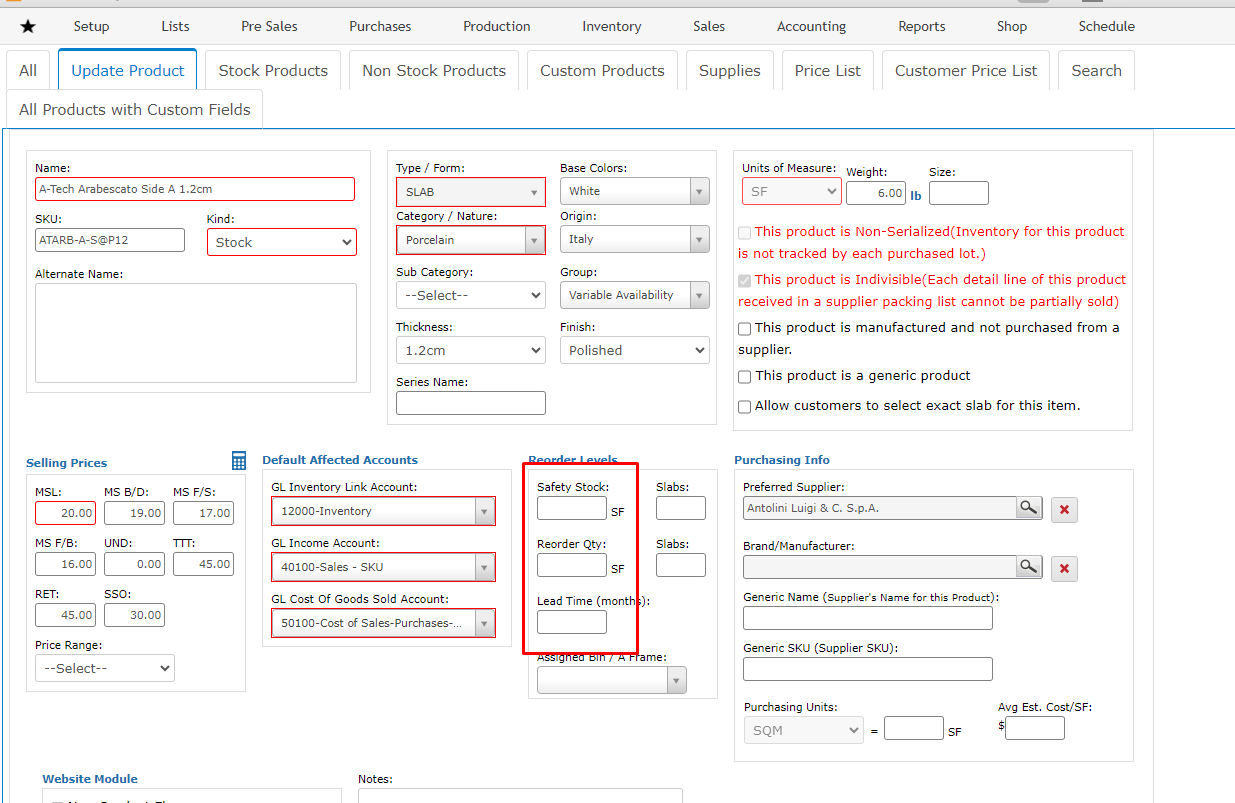
Safety Stock is a level of extra stock that is maintained to mitigate the risk of stockouts due to uncertainties in supply and demand
Lead time is The time b/w the initiation and completion of a purchase process
Reorder Qty Inventory level of an item which signals the need for placement of a replenishment order, taking into account the consumption of the item during order lead time and the quantity required for the safety stock
Based on these parameters, you can run report to purchase the inventory


You can run this report based on the slabs as well as based on the quantity
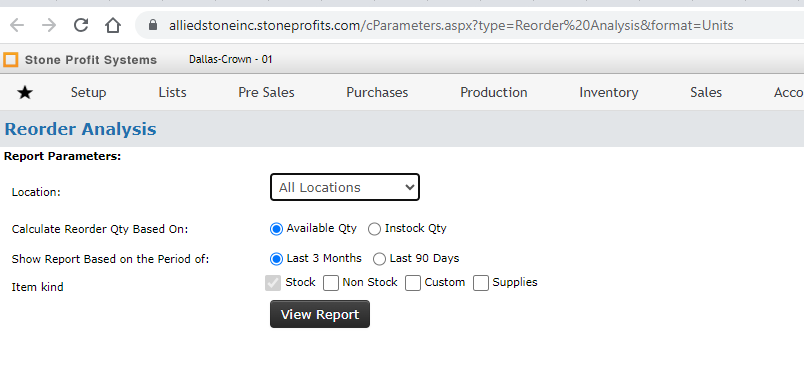

From here you can create Purchase orders by selecting the products
We have forecasting reports as well to estimate the future sales and future inventory requirements.
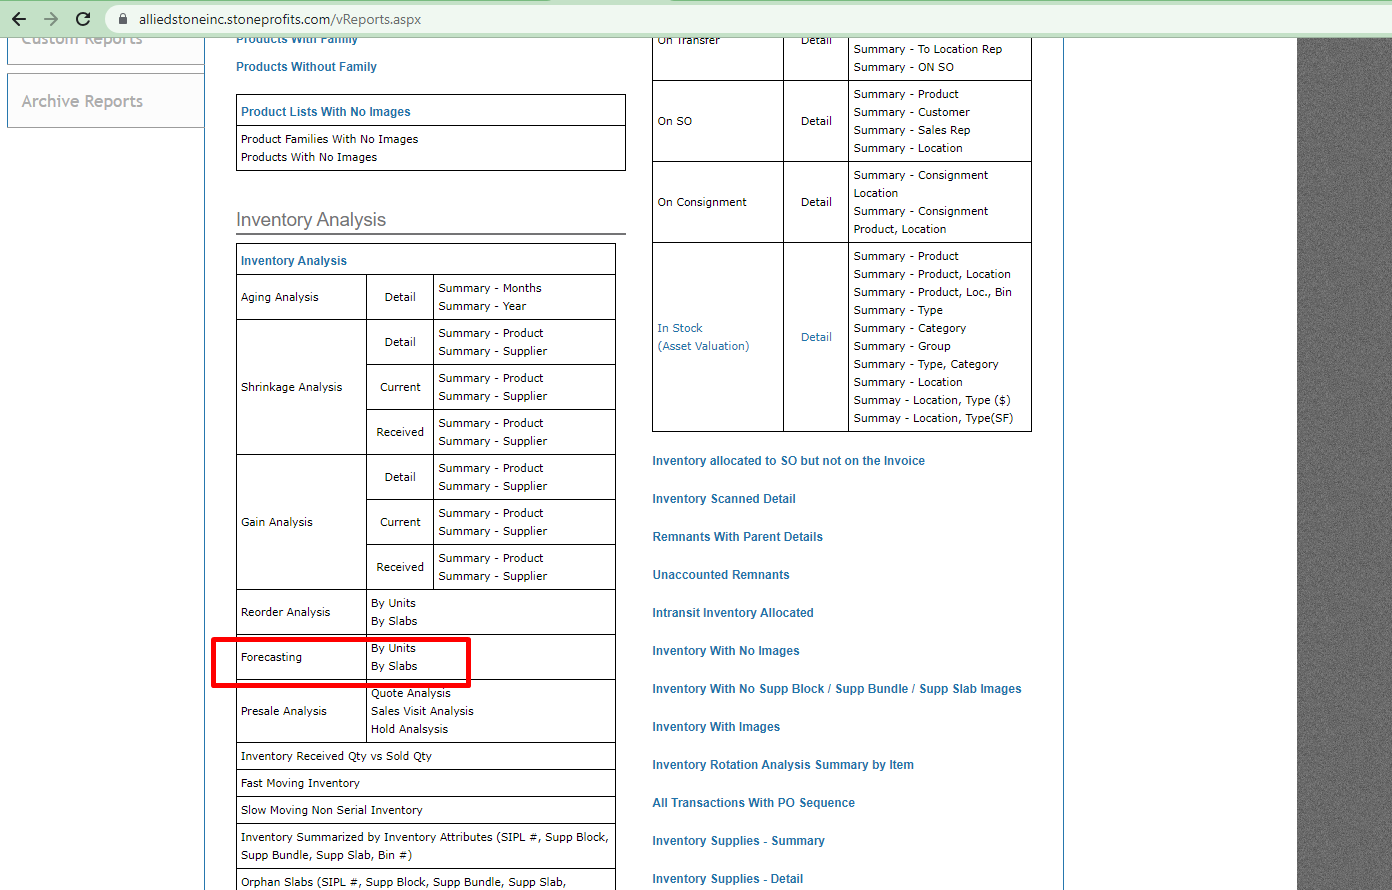
You can run forecasting reports per location


This report shows the historical data for each product, based on this you can predict future inventory needs and you can place orders to purchase the inventory.
Attribution per location
You can setup these parameters at location level

https://alliedstoneinc.stoneprofits.com/cReOrderLevelsByLocation.aspx?ID=14738

https://alliedstoneinc.stoneprofits.com/vBatchUpdates.aspx?tab=1

Batch update for location wise reorder level and safety stock
https://alliedstoneinc.stoneprofits.com/cBatchUpdateProductReorderLevelsByLocations.aspx

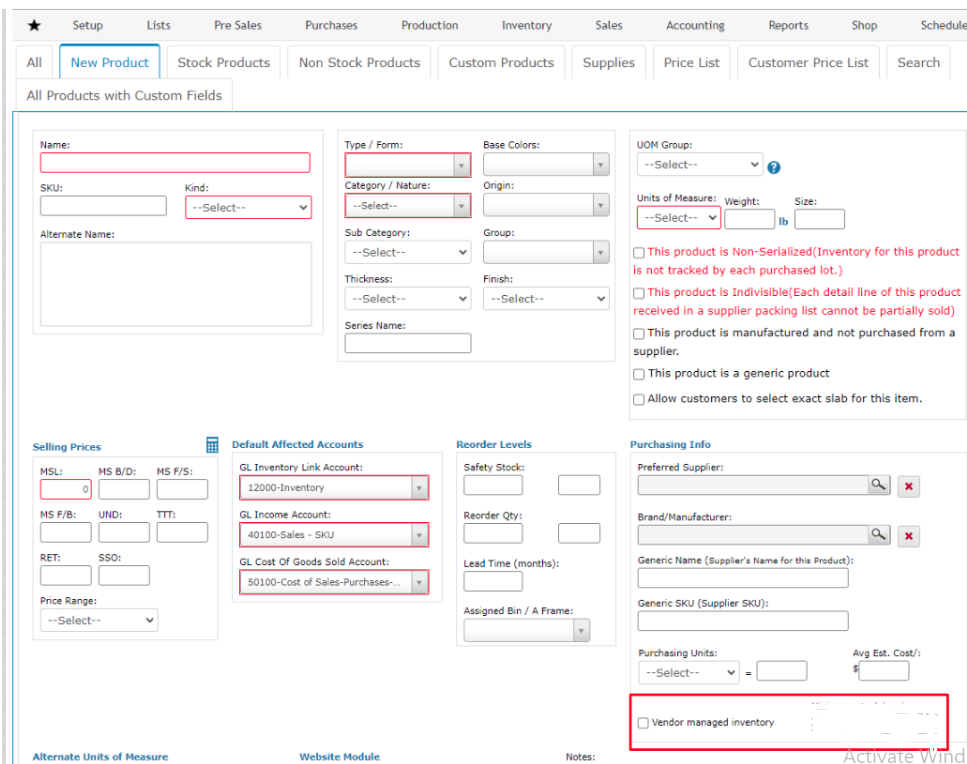
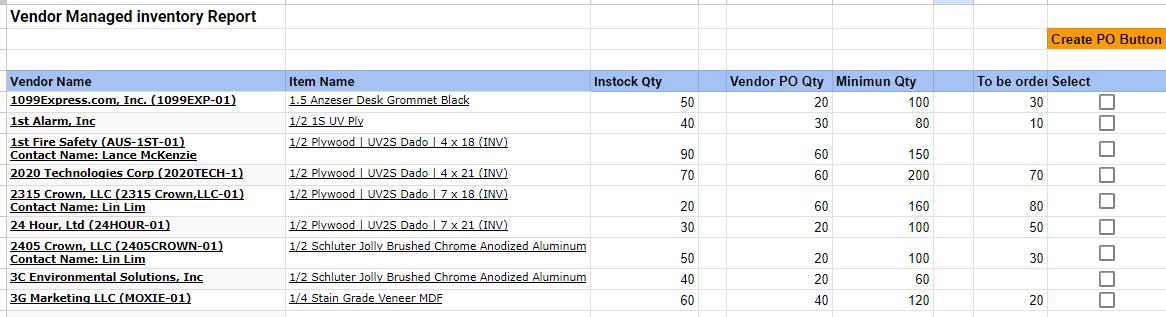
19. Vendor managed inventory (VMI)
(Vendor managed inventory or VMI is used PPE, gloves, some tooling, based upon average use or come out of a vending machine, and Vendor replaces when below a level of qty)
Added custom field called Vendor Managed Inventory
Report for Vendor Managed inventory:
Here, you can select the items and click the Create PO button to create a Purchase order.
20. Kanban - Reorder Levels
(Kanban use an idea in which you visually group parts for use, we would like to group parts 2 bin or 3 bins, for ease of replaces or reorder when a bin is empty, Example, 3 bin kanban, when 1 bin is empty, then system signals for re-order)
Setup Screen: Capacity Setup by Bin and Location

Report for Reorder levels.
This report will show how much capacity is full and empty in those bins based on the location. The ones highlighted in orange can be selected and ordered by creating PO.

22. Upstream/Downstream traceability (inventory Walk through)
(ability to keep track of parts or material in pipeline The accounts for what's allocation, whats on hold, what's in transit, as well as parts that we don't allocate till the order is shipped)
The Reorder analysis report provides all the items with allocated qty, hold qty , intransit qty and
Unallocated SO.
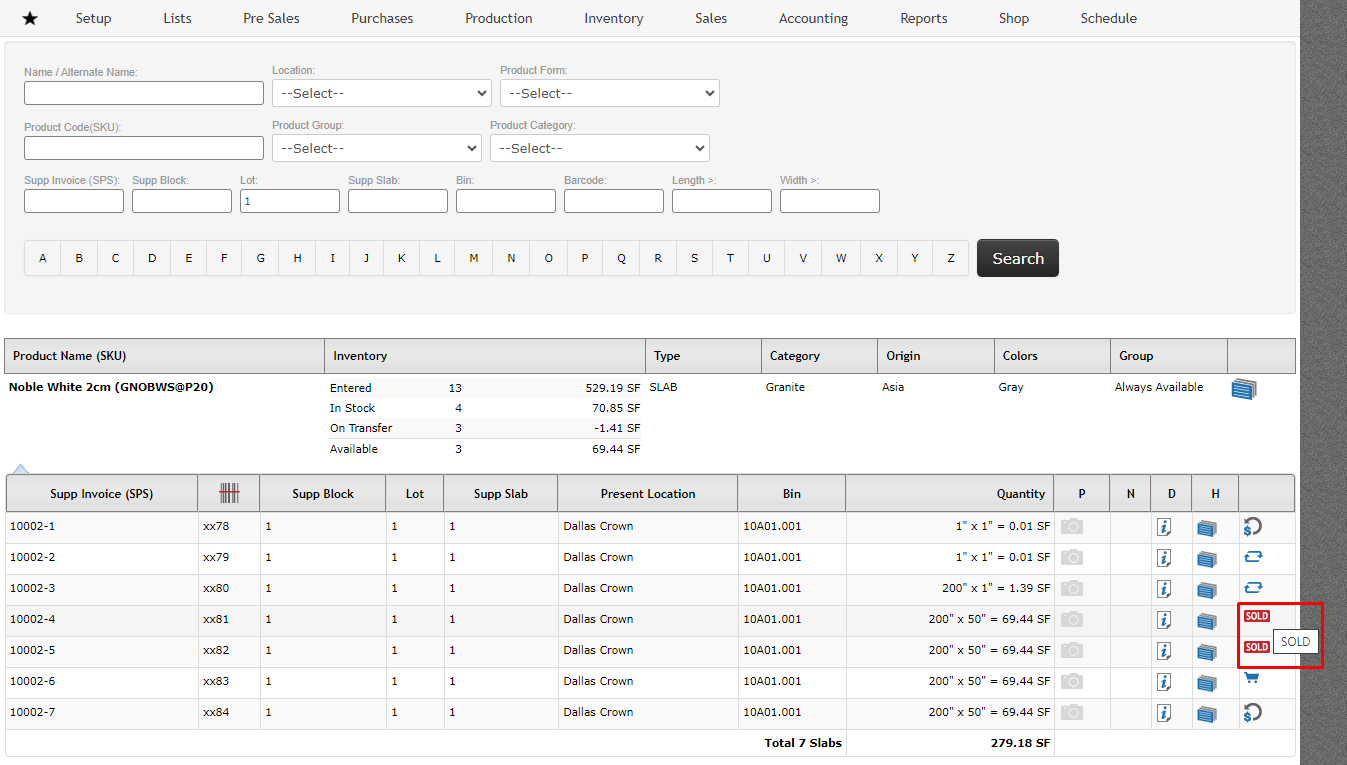
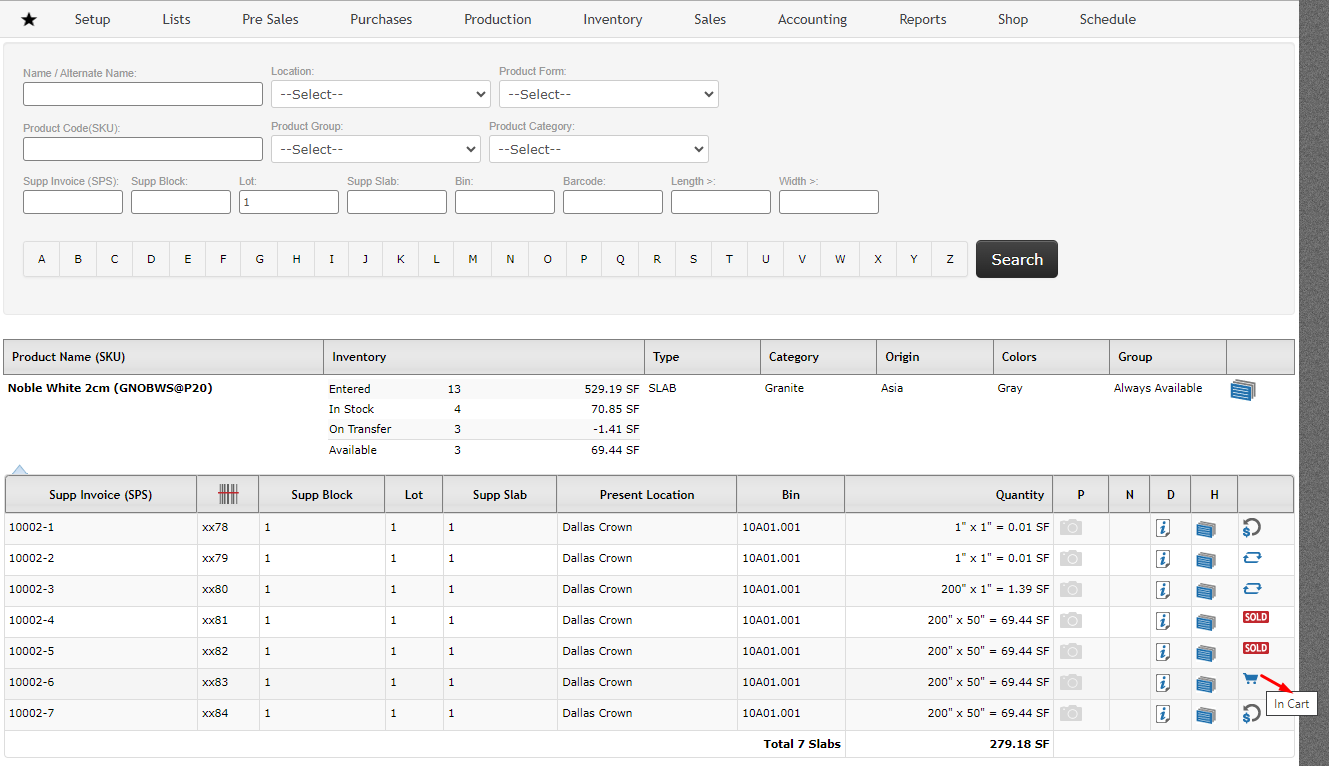
24. Tracking of Lot and Heat certifications
(Ability to track lots and allocate parts by lot to ensure the traceability from supplier)
This report shows the item details with a lot/Block number.

Go to Inventory -> Inventory Walkthrough. Search with the Lot number.


34. PO/Supplier Pricing
(a way for us to get the best use out of pricing breaks across all sites, also to have a way to easily update that pricing due to year end or a pivot in the industry)
Method-1:
In SPS go to Setup >> Admin Tools >> Product / Services Management.
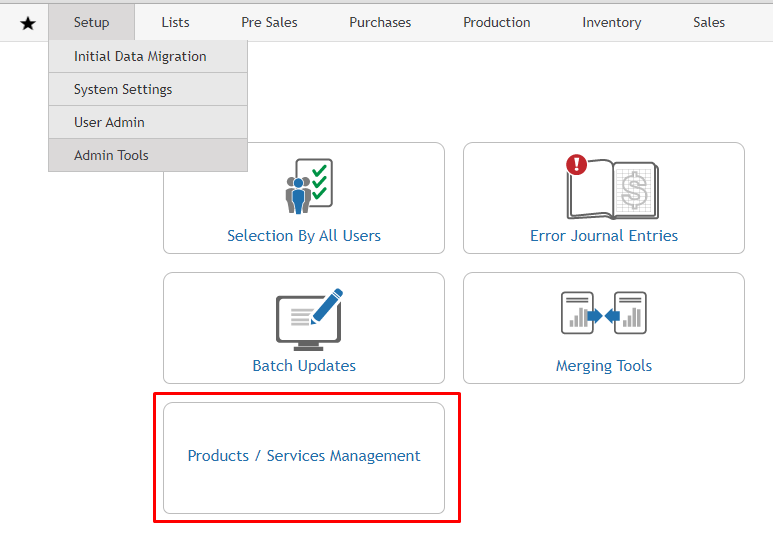
From here you can select the supplier name and click on the update button.

This page shows a list of the products related to the supplier with prices.
Here you can add new costs for suppliers.

Method-2:
In SPS go to Setup >> Initial Data Migration >> Price List and click on Supplier price list Button.


Download these file template and fill all supplier details and upload the file


37. Are more advanced receiving processes (e.g. license plating)
(This is the ability of the system to create Labels for inventory as the materials are received,)
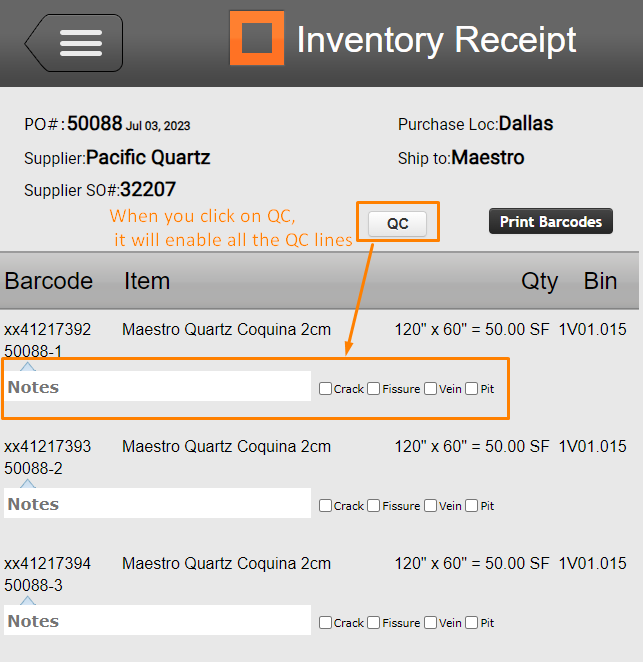
We can generate labels as we receive material, slab labels, bar code
You can print the Print Barcodes once you receive inventory.
https://alliedstoneinc.stoneprofits.com/vSupplierInvoice.aspx?ID=1292110

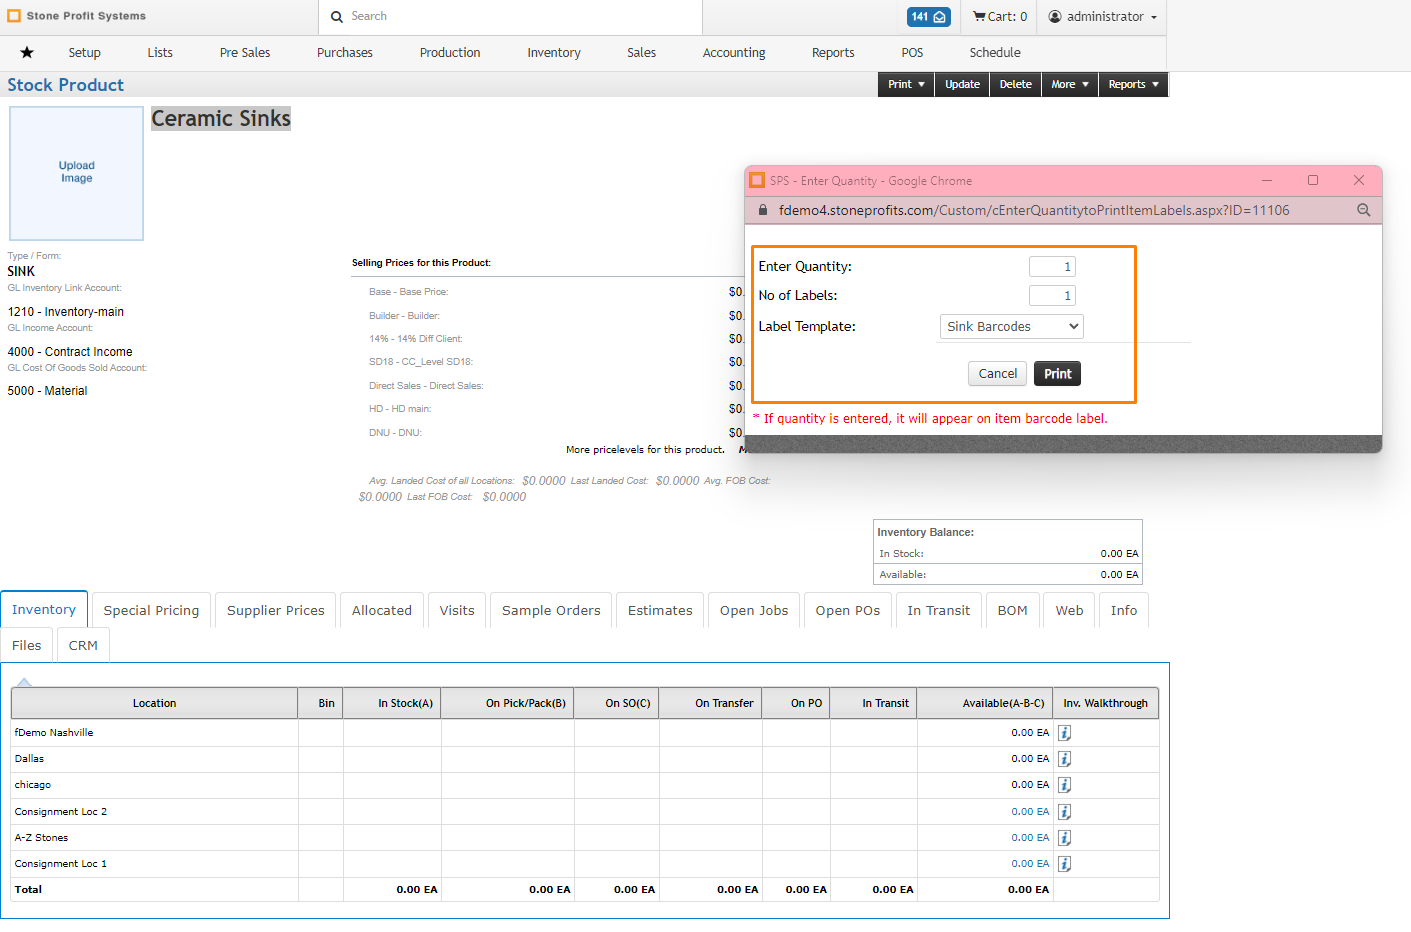
Once you click on barcodes it will give options to you enter how many copies that you want to print


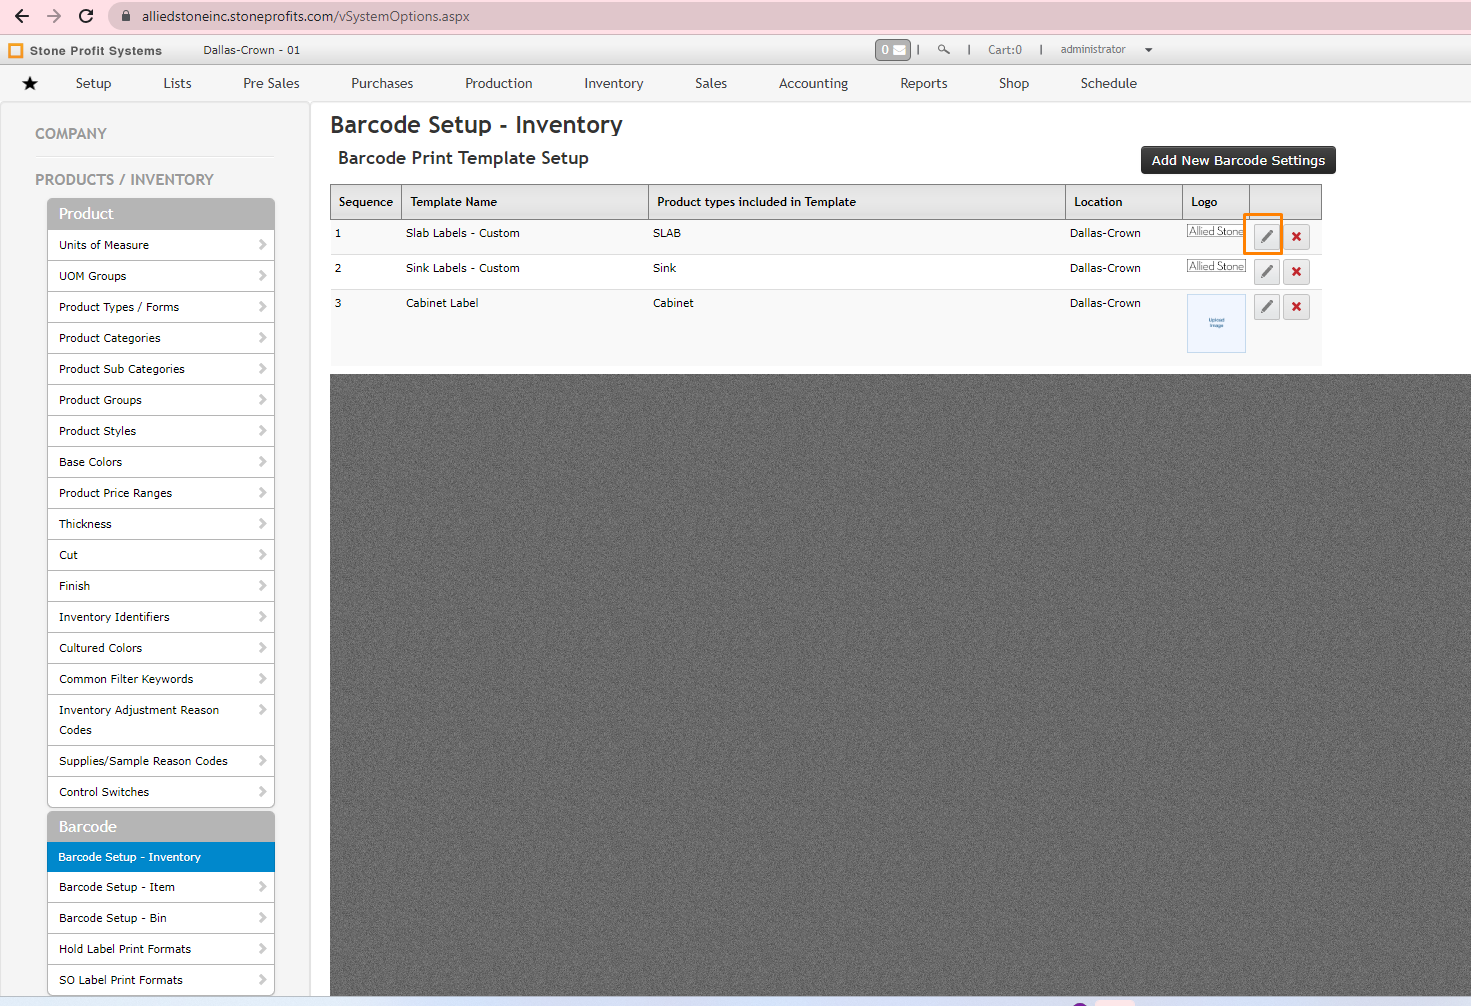
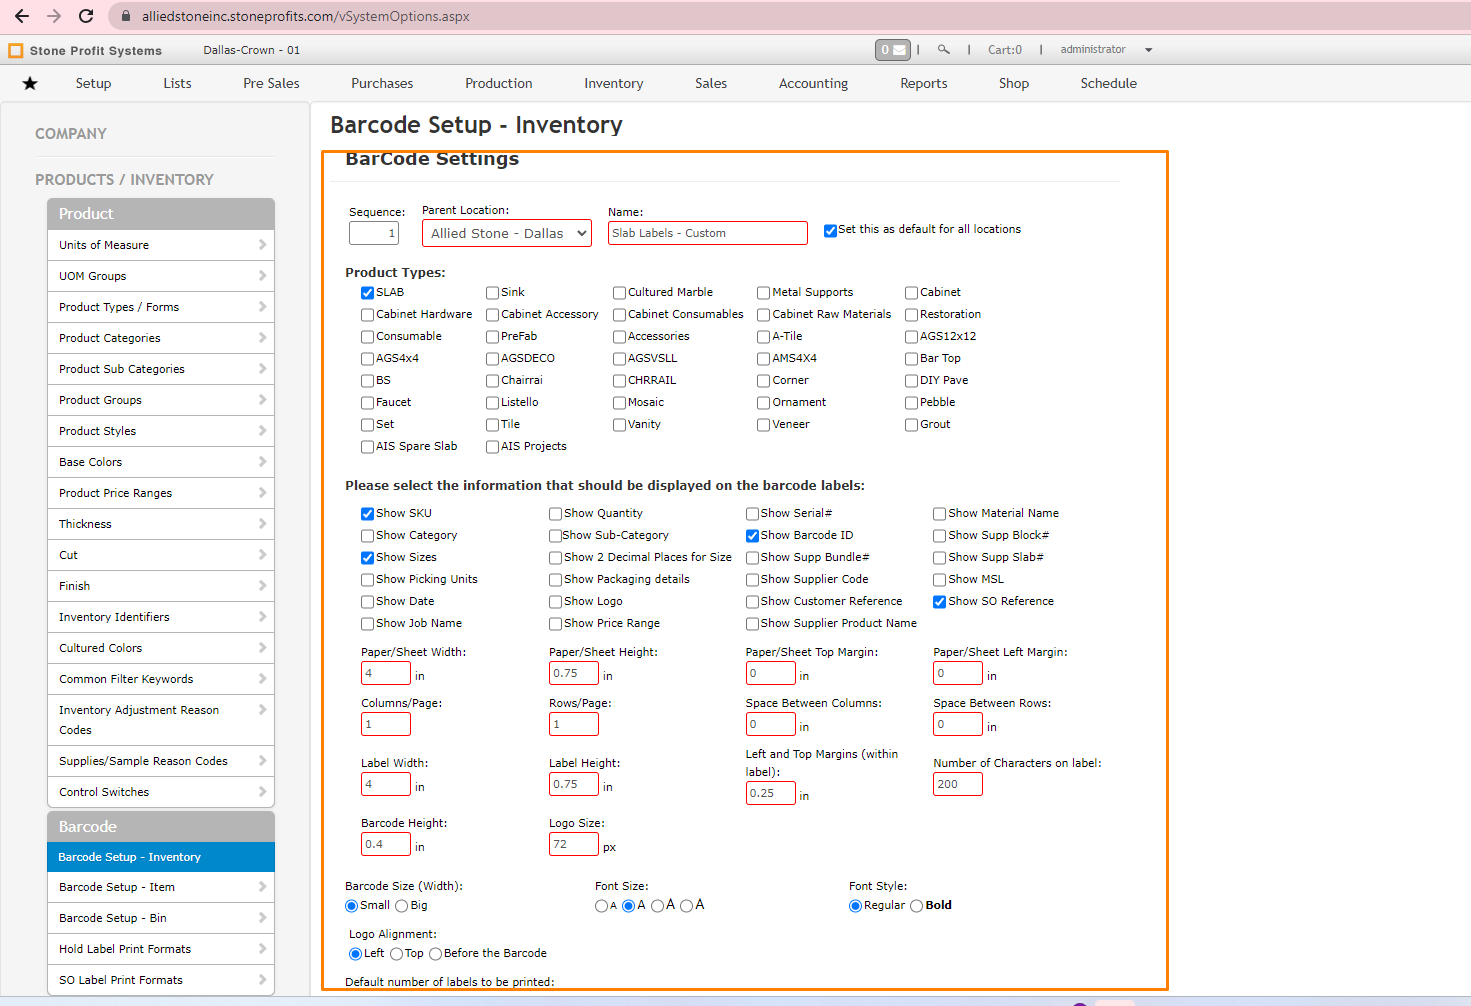
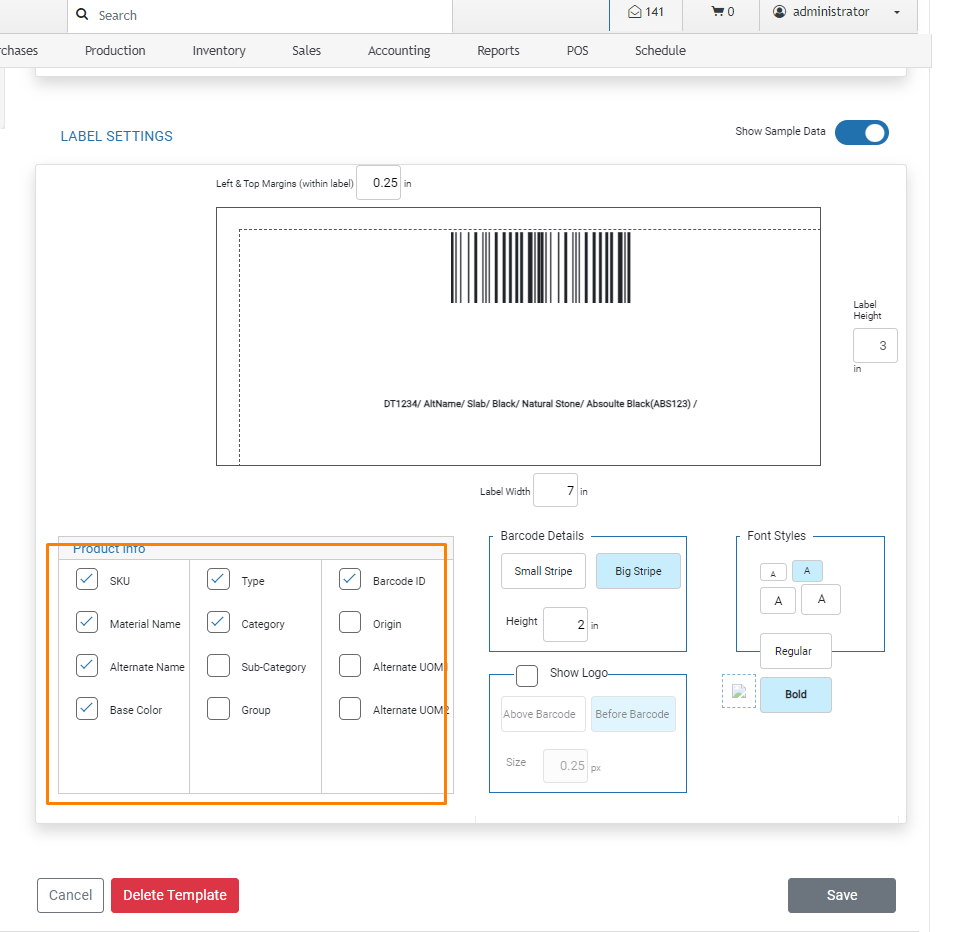
If you want to print more information, you can change settings in the system setup.
Setup >> System Settings >> Products/Inventory >> Barcode >> Barcode Inventory
We don’t have options to QR Codes
38. Do you have an automated three-way match for accounts payable?
(Please demo best practice for 3 way match in SPS)
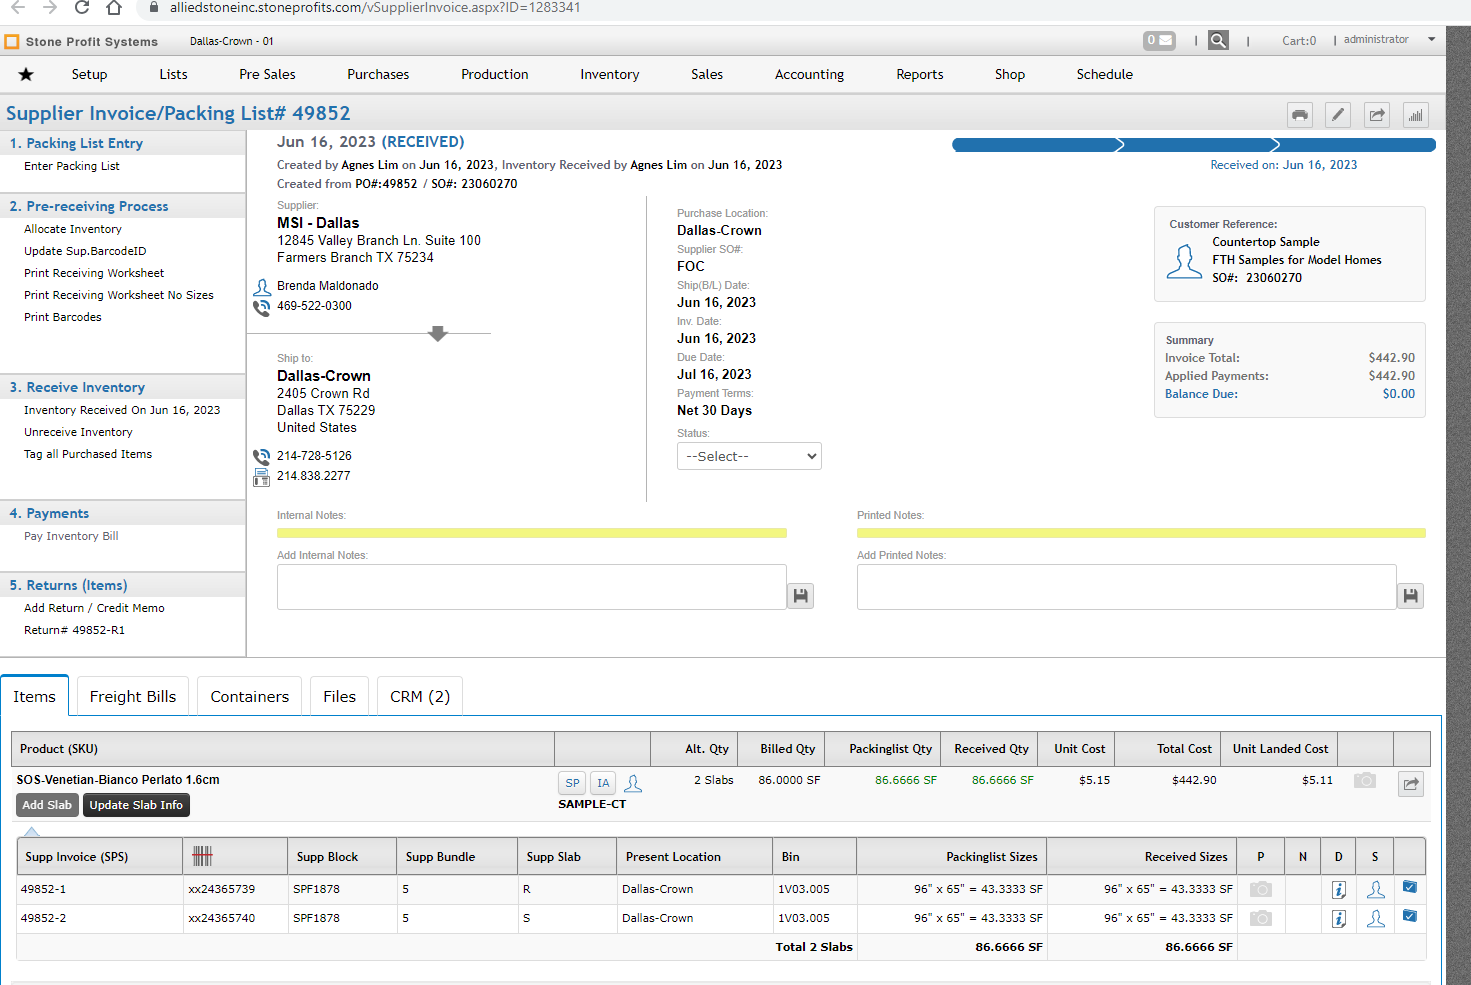
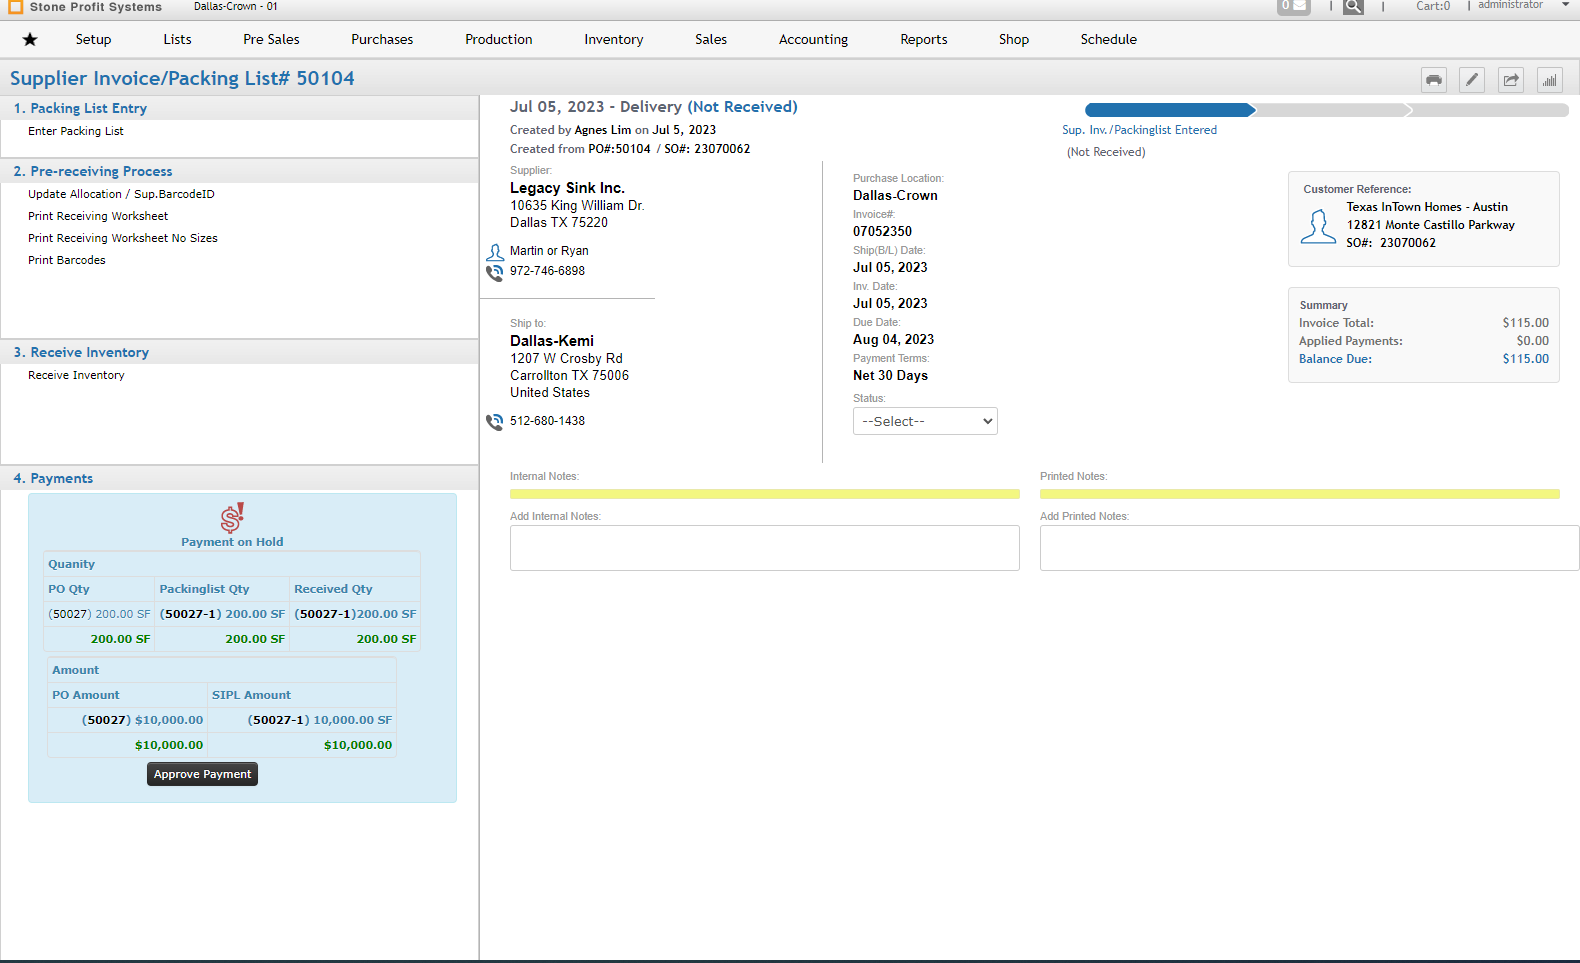
The SIPL Payment section will show the payment on hold option until it's approved . Once approved will show the pay Inventory bill option.
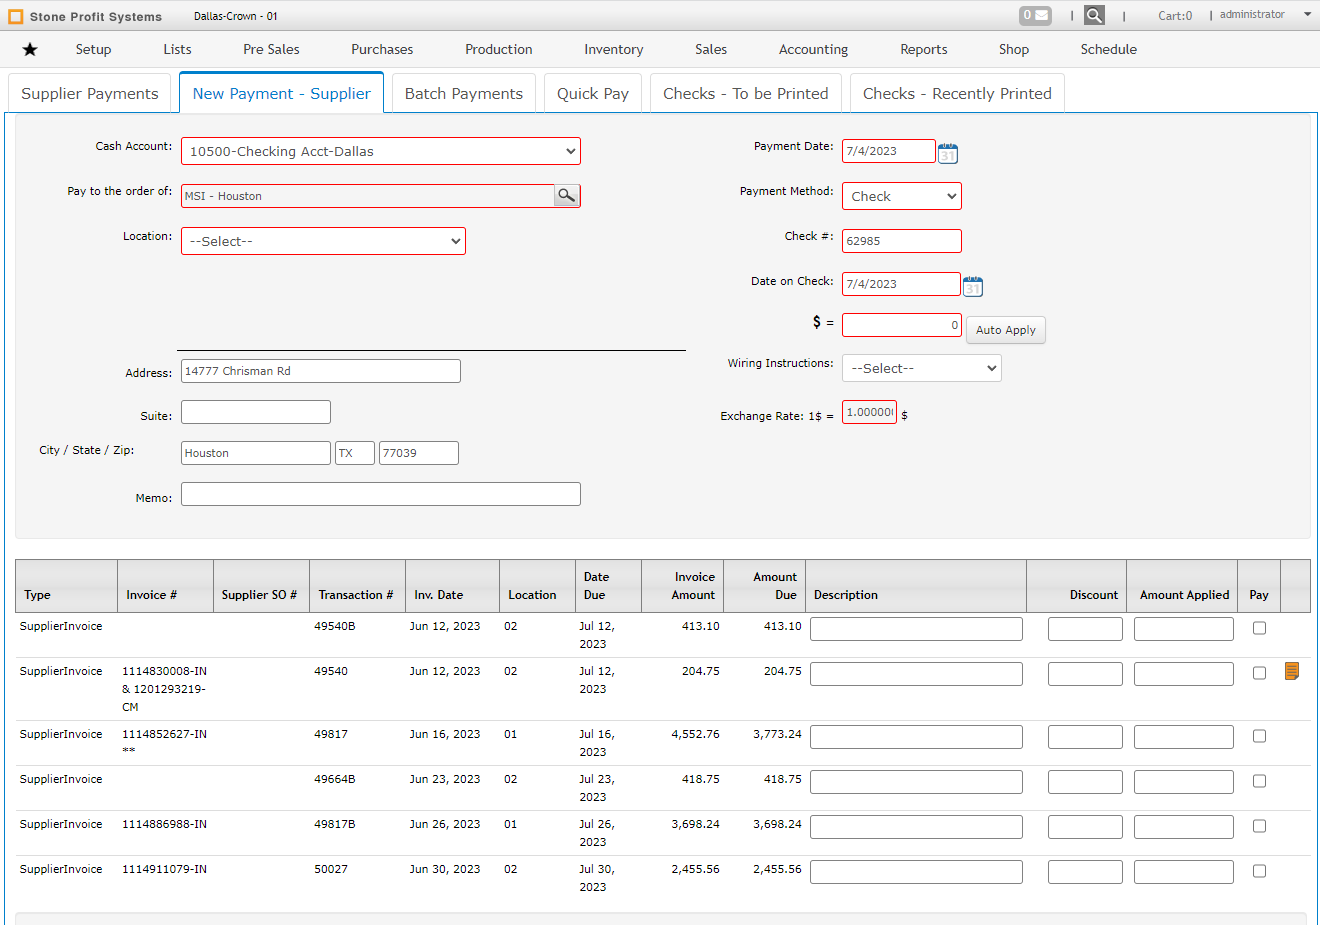
3 way match screen of single SIPL payment on hold scenario
Payment to Inventory supplier screen will show the payment hold icon until the 3 way verification was approved.

3 way match screen of single SIPL payment approved scenario

3 way match screen of multiple SIPL before approved payment on hold scenario

Payment to Inventory supplier screen will show the payment hold icon until the 3 way verification was approved.
3 way match screen of multiple SIPL approved scenario

41. Employee PO requisition process
(Allow a person in a dept, of a site to generate a request for materials that then would be followed up on by the purchasing group, using primary vendor first, with a click of the button the PO is created, approved, and then sent of, and follow up would allow for notification to requestor upon the receipt of those goods/service)
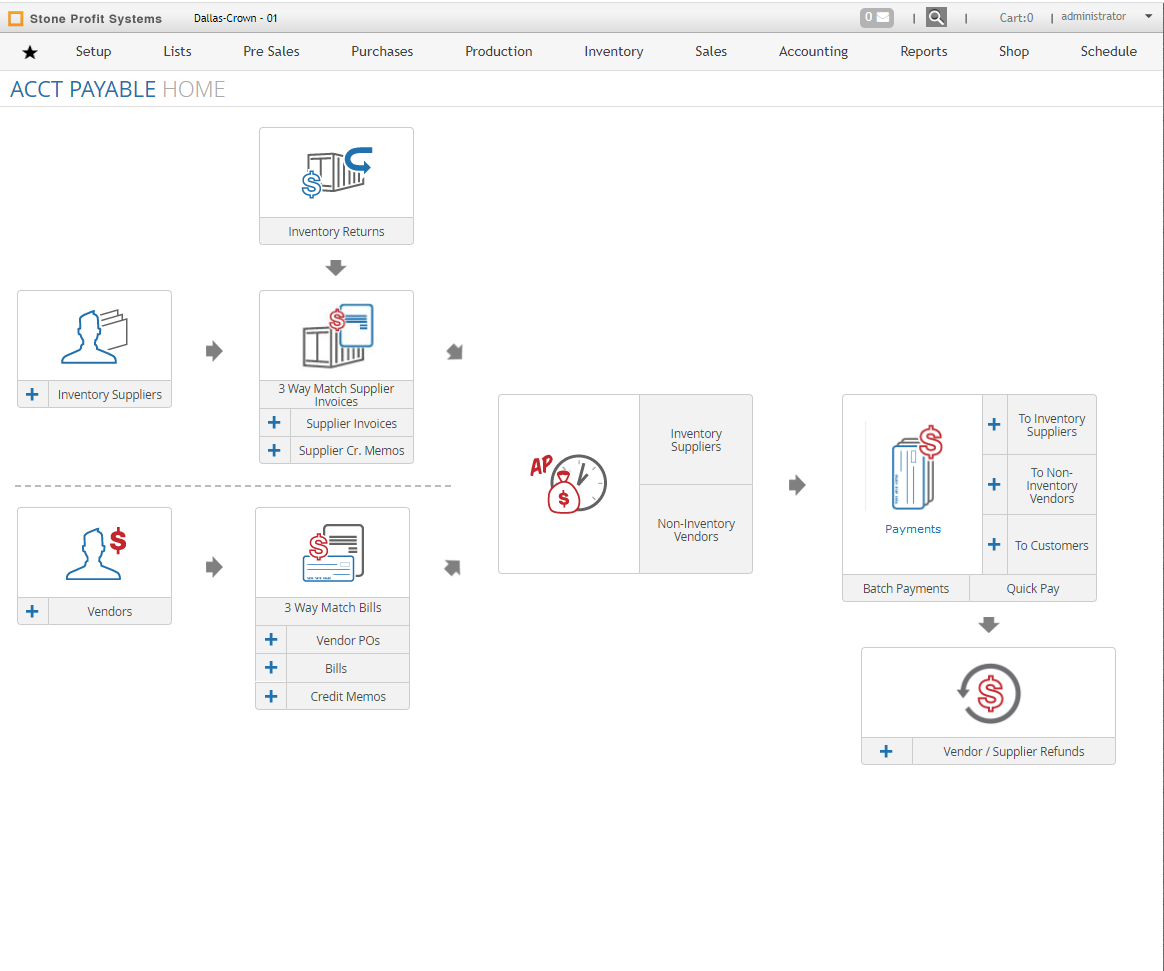
An option for PO request is given from the Purchasing Home page.

Employees do have to pick a supplier. And can proceed to add required products.
Once the products are added, the PO Request list show all the requested submitted
The user’s who do not have access to create a PO will see only their PO requests.
Users who have access to create a PO will see all the PO requests submitted by the employees.


On reviewing and to proceed with raising a Supplier PO, the authorized user clicks on “Add Purchase Order” and saves the PO.
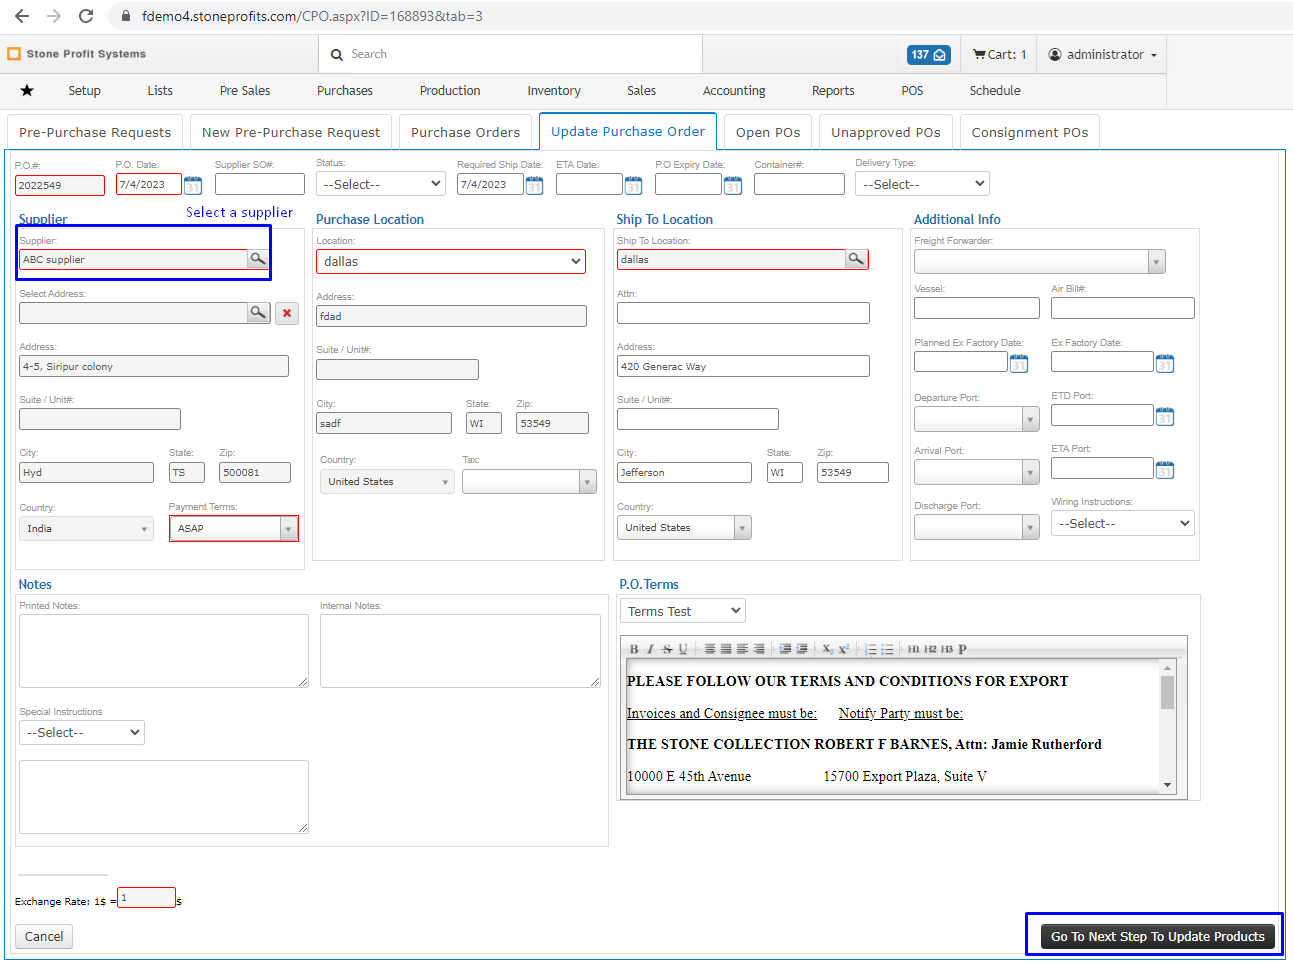
Once the PO is saved, the approver can edit / remove the items as needed and then send it to the supplier.

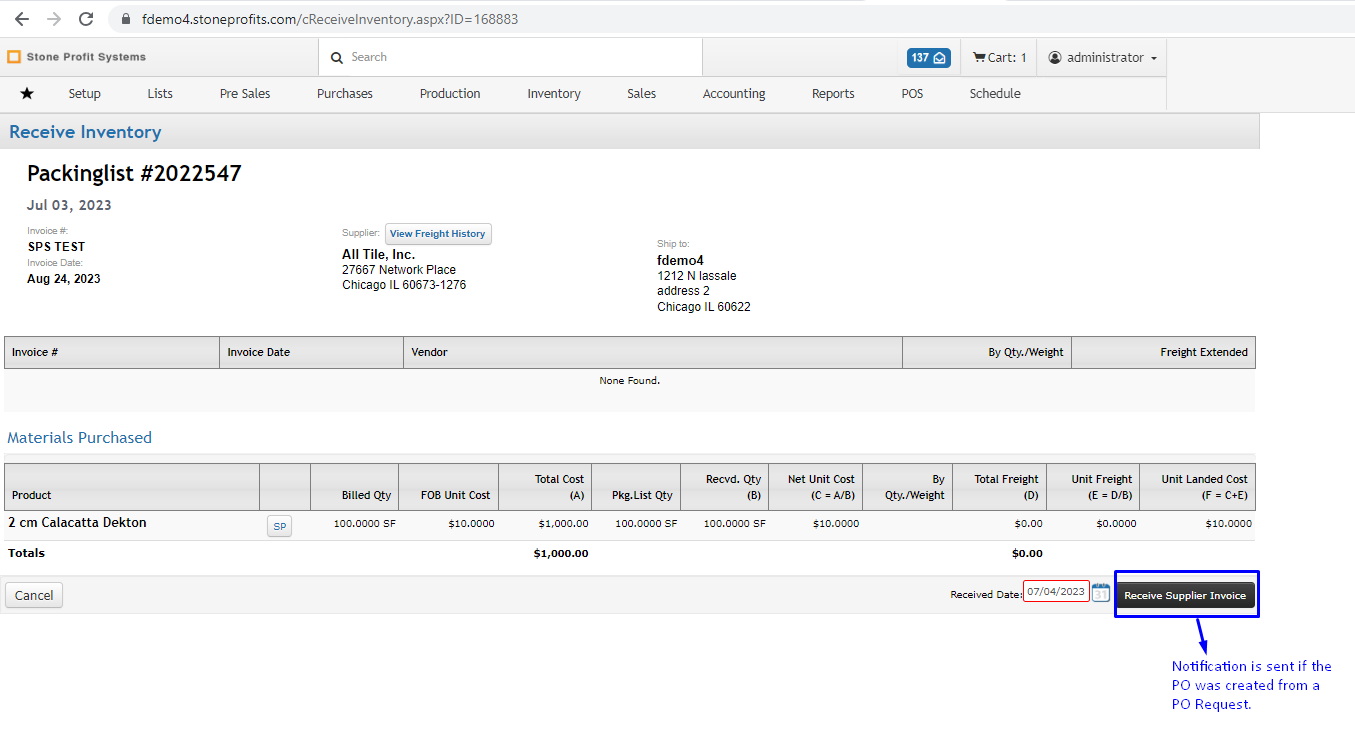
When the inventory is received in SPS, it will be checked if there is a PO request associated with the received items. If so, then an email notification is sent with the Item name and receiving date of the inventory.
Receiving
46. Shop floor/dockside material receiving
(Needs a robust mobile receiving solution, without having to go into the system clicking through menus.)
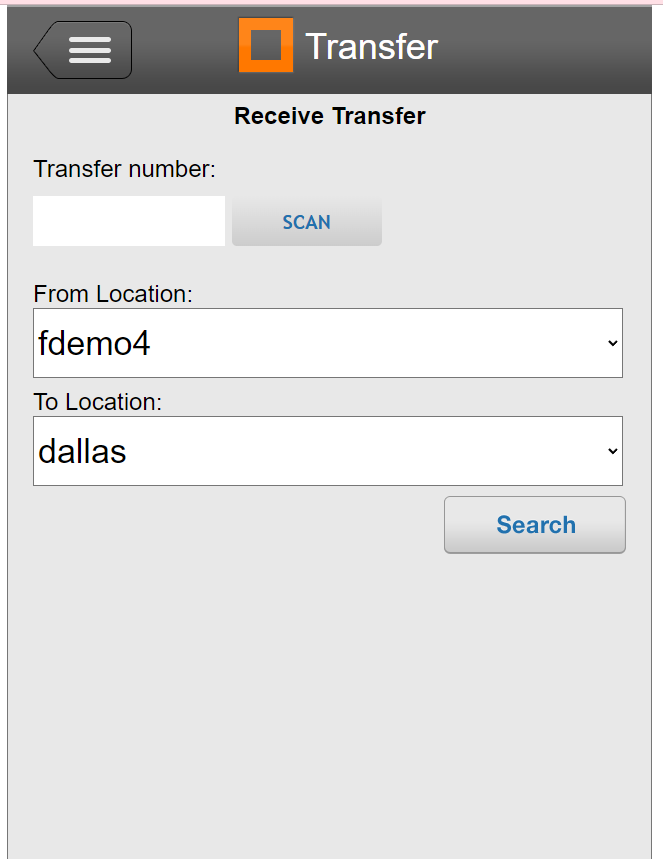
From the Mobile version we will give the option to Receive the Inventory.
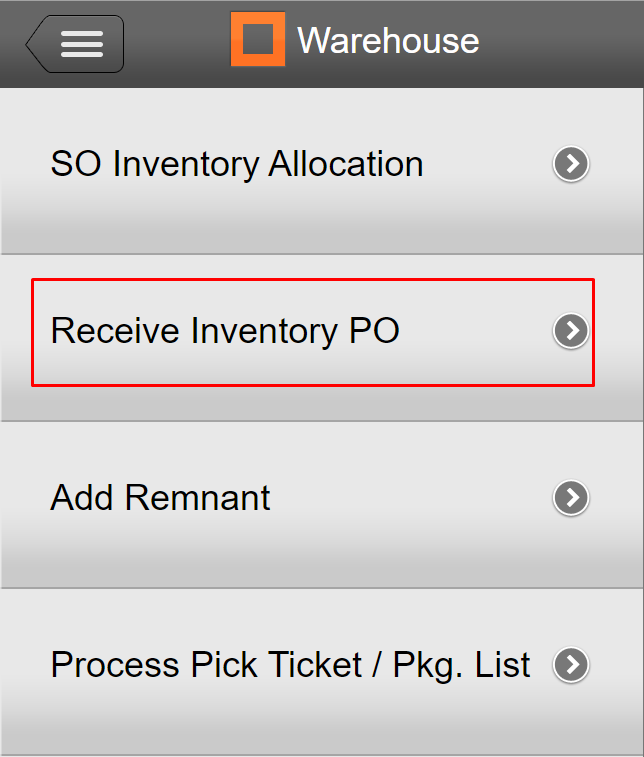
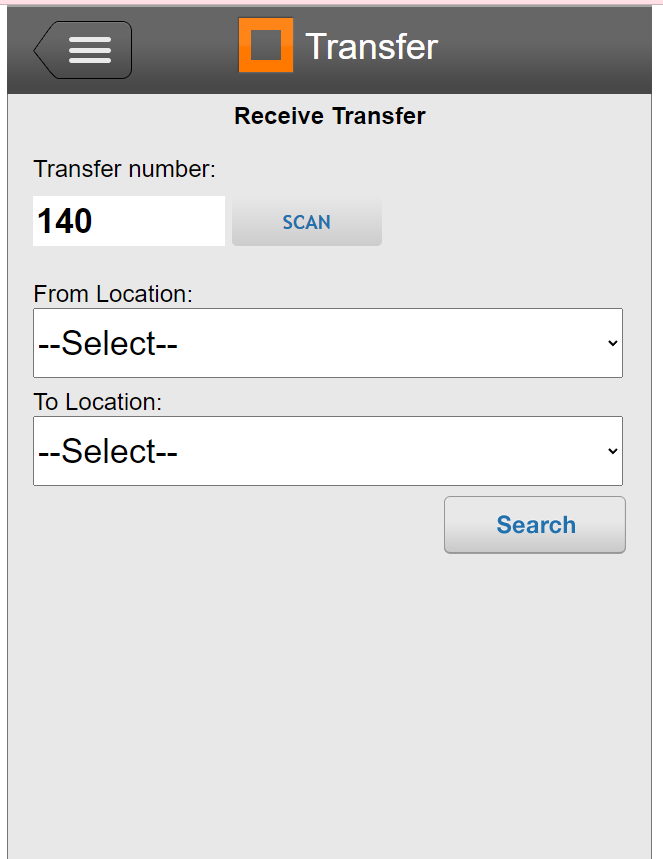
When you click on Receive Inventory PO, it will ask you to scan or input the PO number.
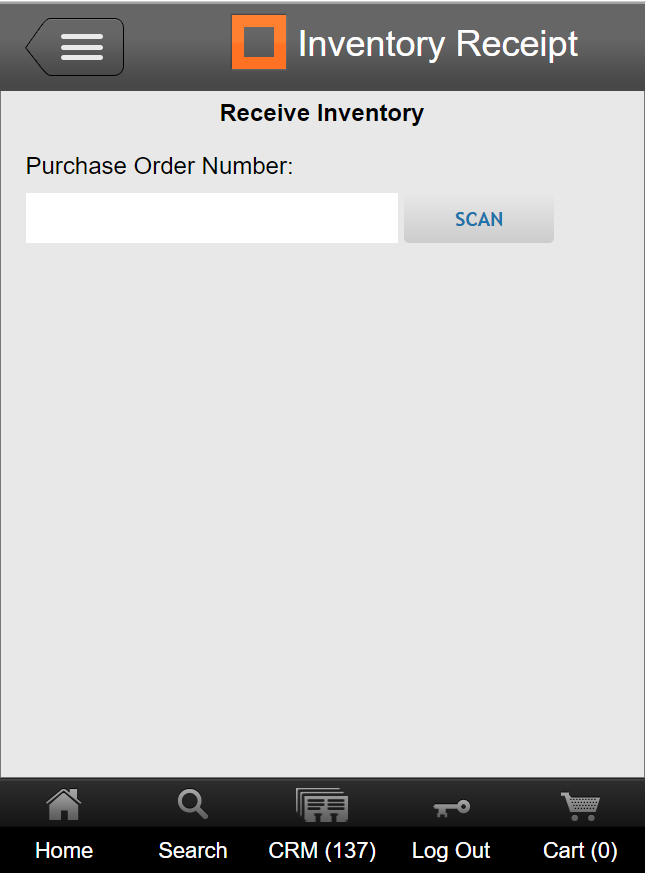
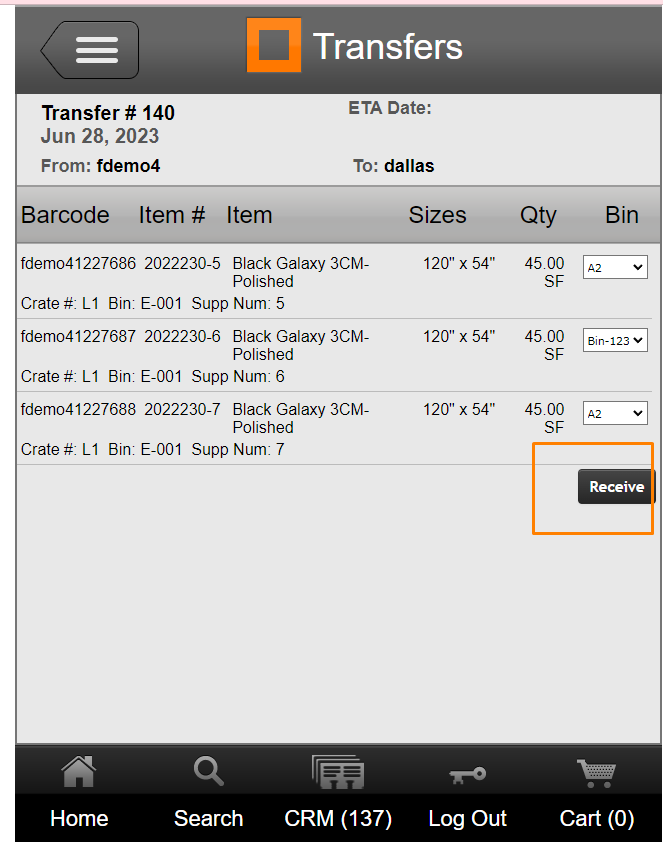
As soon as PO Number is scanned, it will show the Items and give the option to enter the Packing List Details.
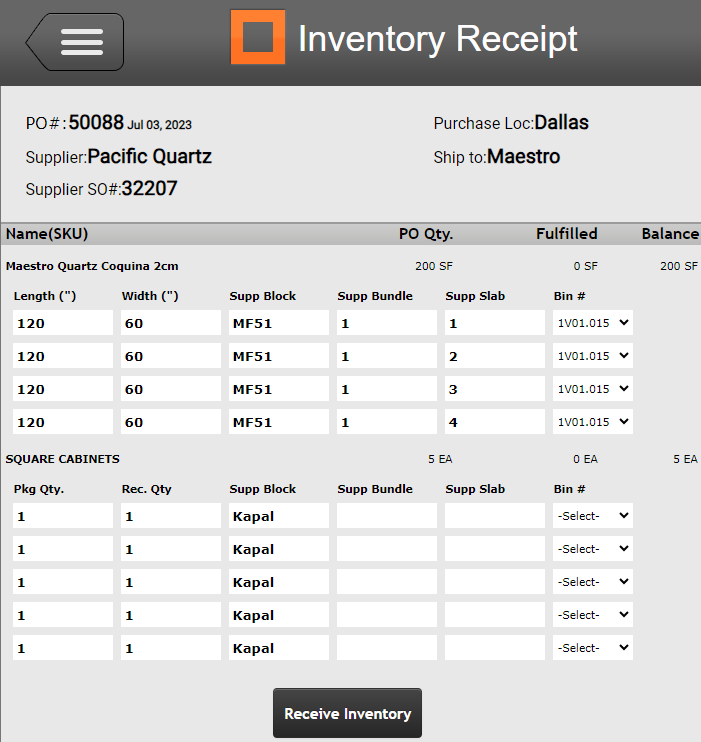
Receive Inventory will create an Inventory Receipt in the system.
And from the View Inventory Receipt Page, we will give the option to print the barcodes as well.

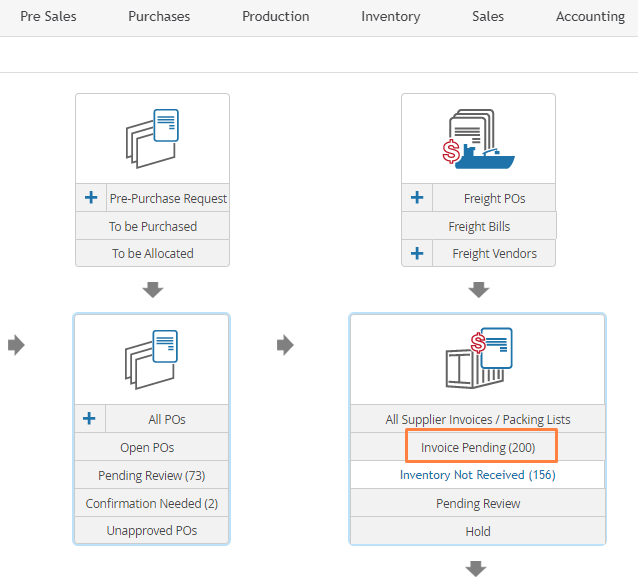
Note: The Supplier Invoice will not be created, the accounting team will go the Invoice Pending section and create the Invoice.
Subcontractors/Drop Shipments
52. Ability to subcontract out any of our purchased items before receipt?
(ideally we should be able to order materials, that would then be dropped shipped directly to a outside vendor, who will do some work, and be paid for said work, then shipping material to us)
While creating the Purchase Order, under ship to location dropdown. We will show the Vendors List as well. So, you can select the Subcontractor from that list.
Then the material will be delivered to your Subcontractor.
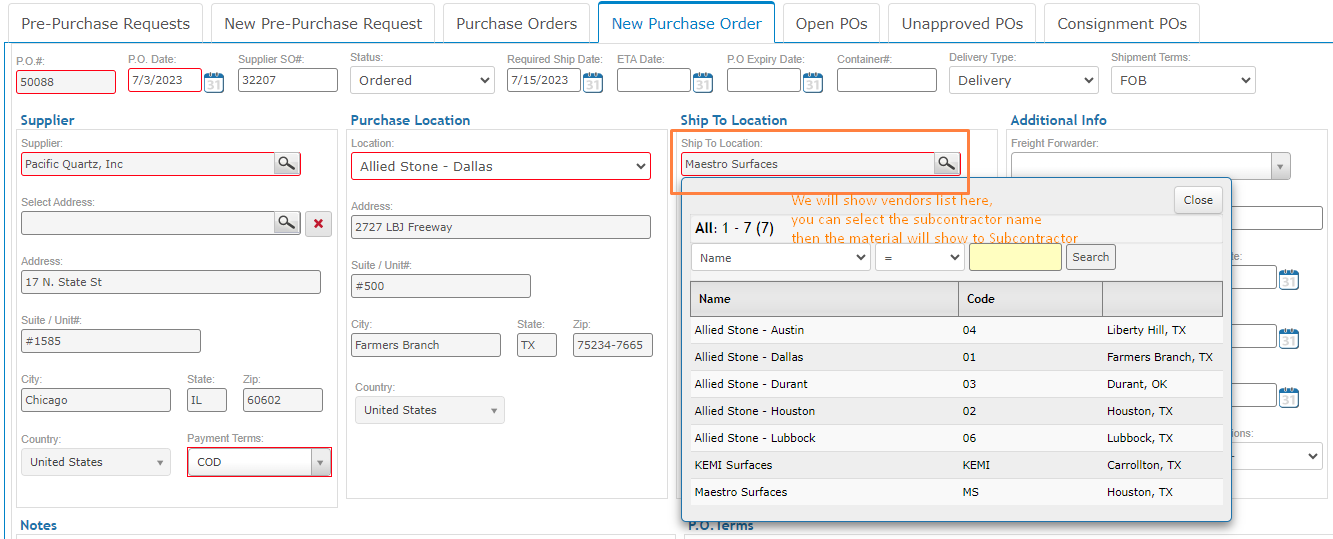

The PO print will show the Subcontractor address in the Ship To section.

Supplier will deliver the material to the Subcontractor location. Subcontractor will do his work and deliver it to the Allied actual shipping warehouse.
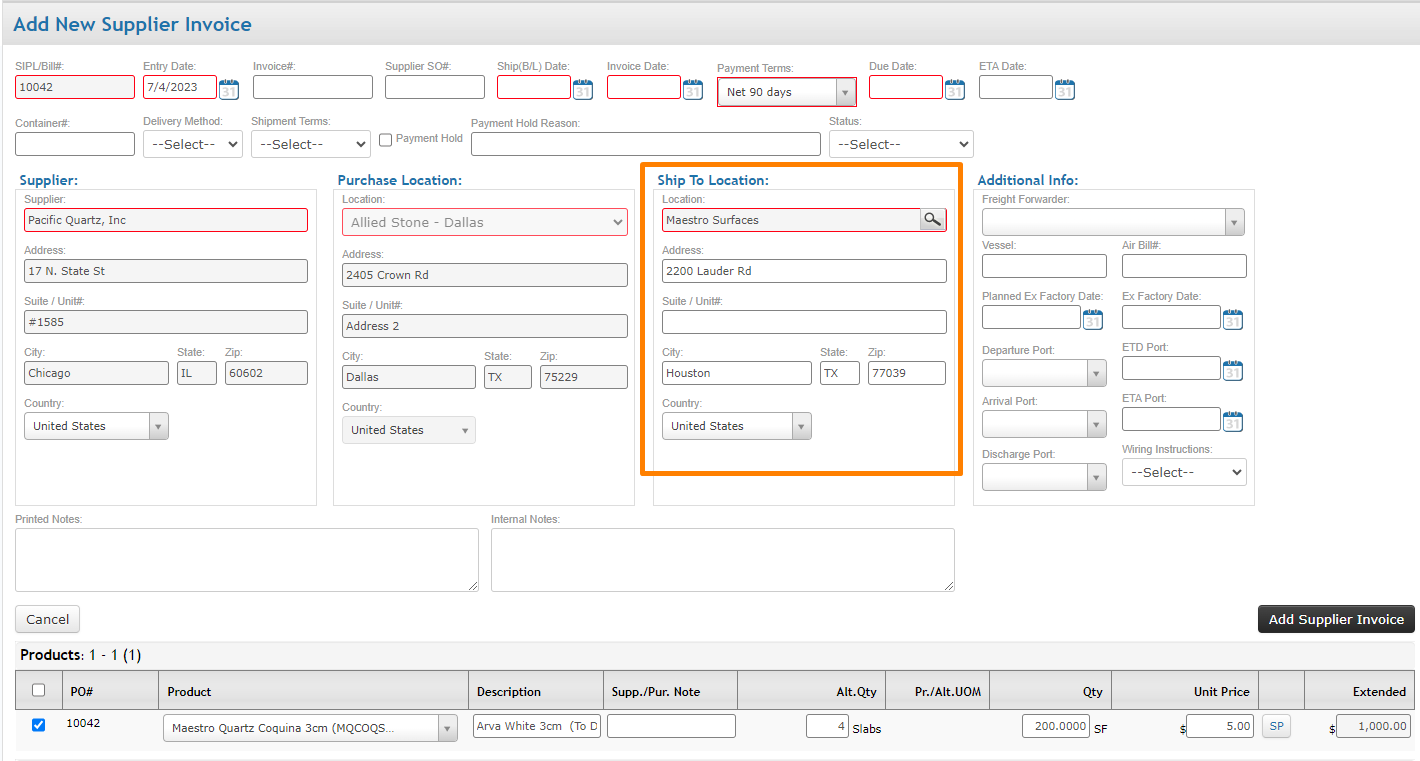
At the time of creating the Supplier Invoice / Packing List, you need to change the Ship To location from Subcontractor location to actual shipping location.
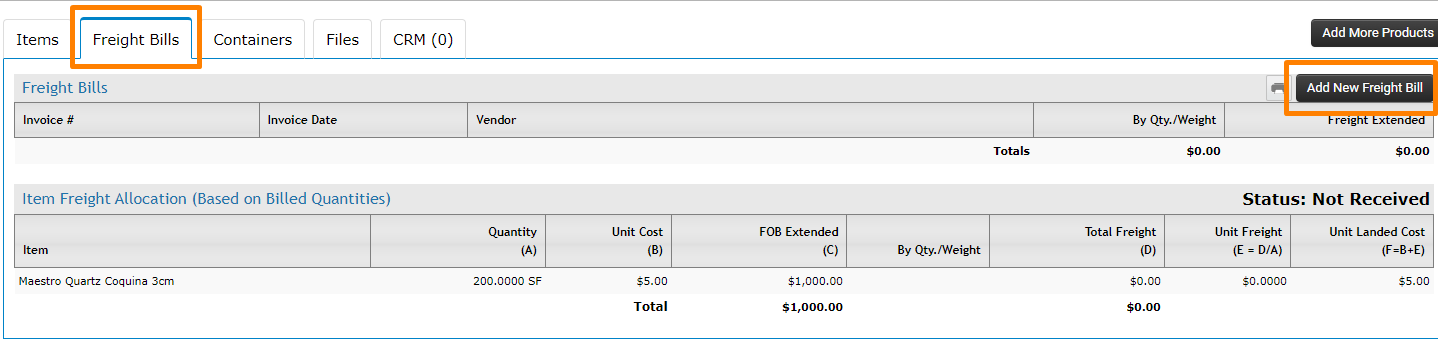
After the SIPL is created, you will create the Freight/Expense Bill for Subcontractors with their charges.
55. Drop shipments available within POs
(Drop shipment of PO from supplier to vendor, or another site)
Open any dropship Sale Order for which you want to create a DropShip PO. Click on "Add P.O" button
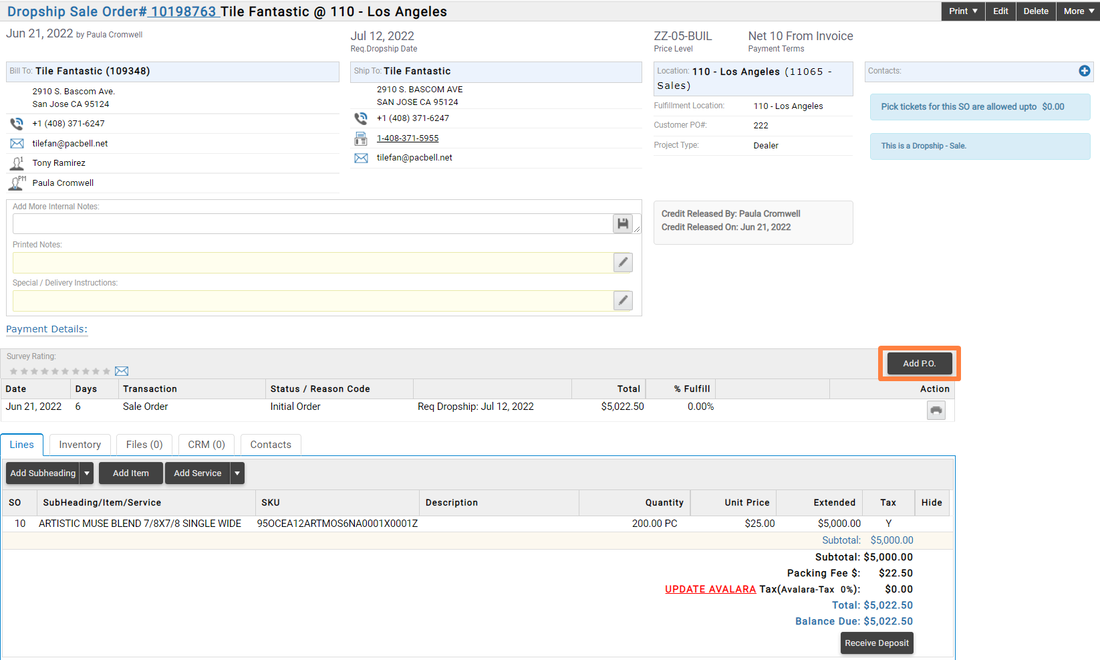
After clicking on Add P.O. button, it will redirect to a Purchase Order creation page, where you need to confirm the shipping address, Items and other information. Click on "Add Purchase Order" button to create the DropShip

Check the ship to address and confirm the Delivery Type as Dropship, Select the Required products to be dropshipped to the customer. Add any applicable charges. After filling out all the information, click on "Add Purchase Order" button to save the DropShip PO.
This will create a Dropship Purchase Order as show below.
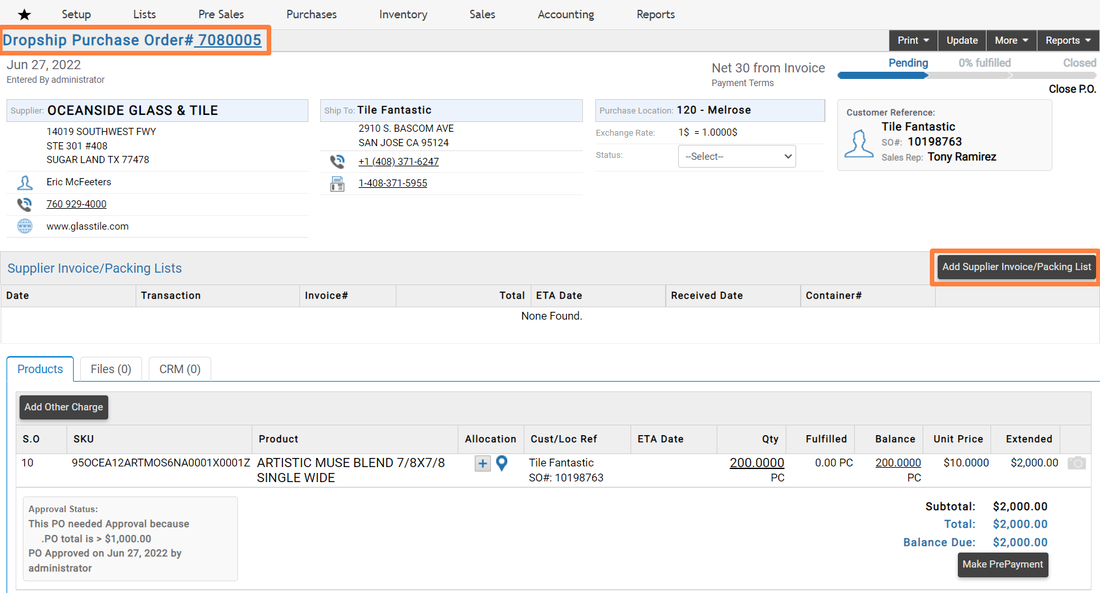
Click on "Add Supplier Invoice / Packing List" when the supplier confirms and sends the confirmation Packing List.
That will redirect you to the new Supplier Invoice page, enter all the required information and click on "Add Supplier Invoice" button.

Enter the Invoice number, Shipping date, Invoice Date and other provided information. Select the Products as in the packing list and enter any other charges and click on "Add Supplier Invoice"
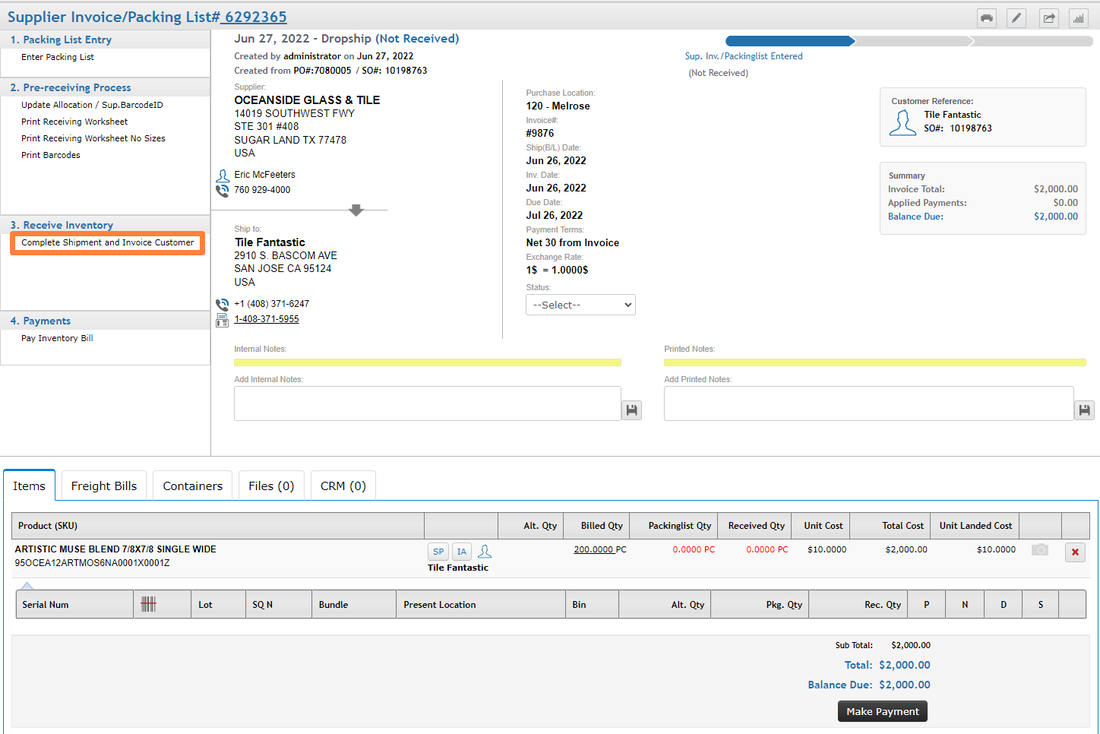
After the confirmation from the customer, if the products have been received by the customer. Click on "Complete Shipment and Invoice Customer" to mark the SIPL as fulfilled and Invoice the customer.
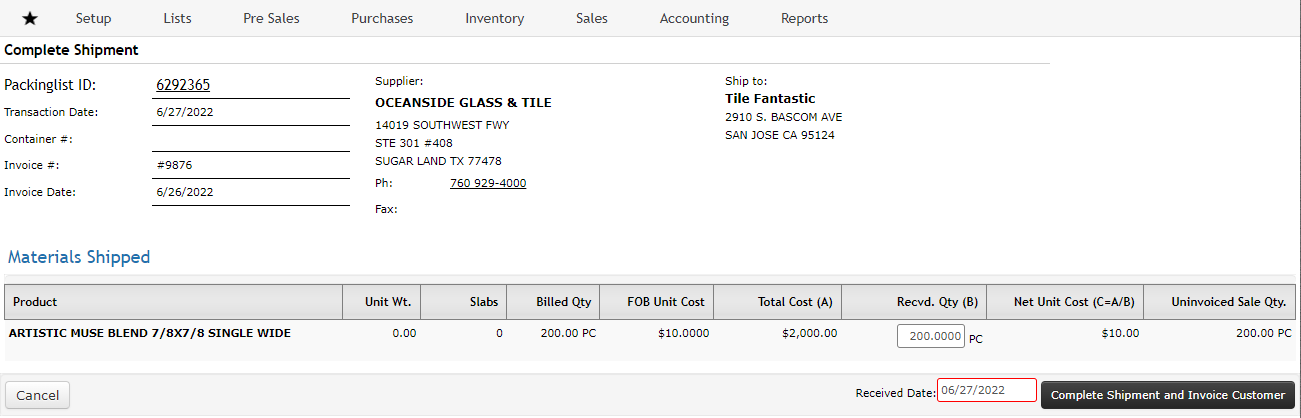
Select the received date and click on "Complete Shipment and Invoice Customer".
This will redirect you to Invoice Creation page, where you need to confirm the items to be invoiced and any other charges.

After entering and confirming the details click on the "Create Invoice" button to create the Invoice for the Sale Order to the Customer.
Suppliers
59. Supplier Status - Supplier Workflow/Approval
(Scorecard for Suppliers, way to keep track of performance or any needed information for given supplier)
Supplier performance Report :
In SPS go to Setup >> System Settings >> Sales >> Survey Questions.
Here, we can add what are the questions displayed in the scorecard page.


Scorecard page for the Supplier performance:
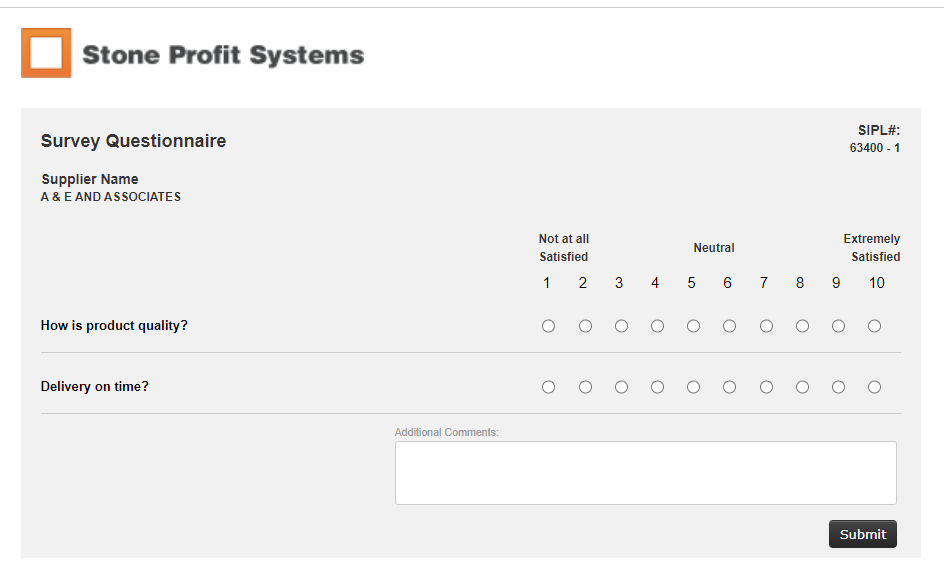
Report for Supplier Performance scorecard.

61. Supplier SRM tools
(Any available tools related to Supplier relationship Management)
In SPS go to List >> Suppliers

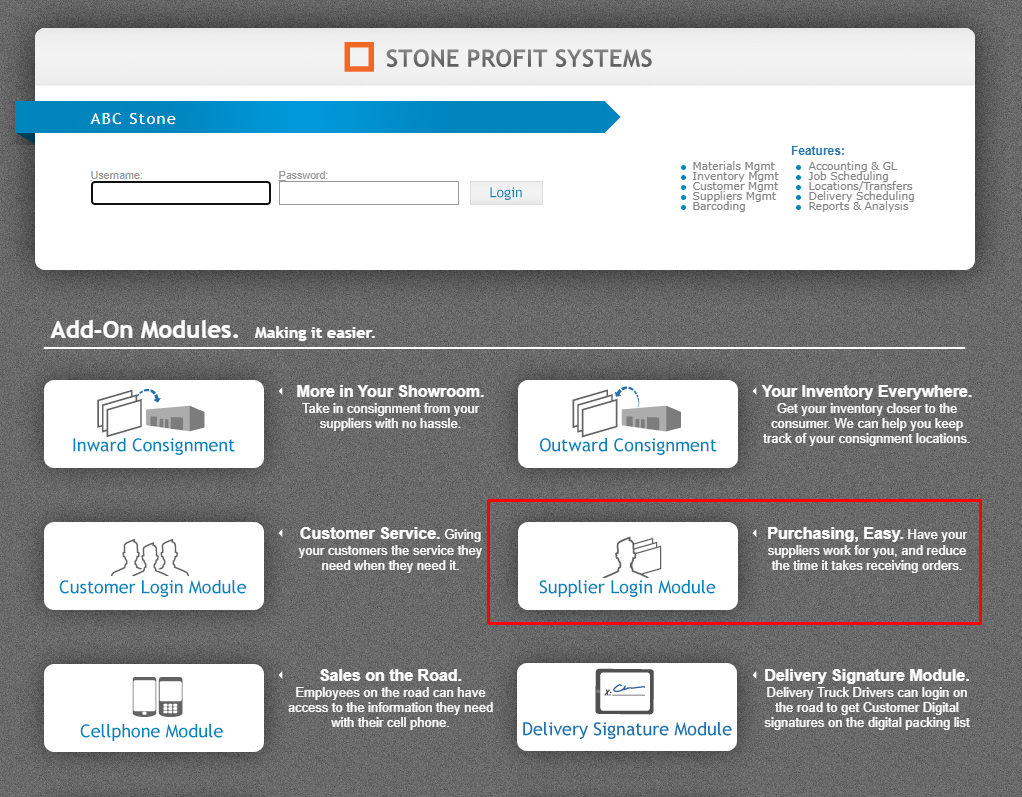
You can generate supplier login details on the create supplier page.

You can login using the supplier login details by clicking on the Supplier Login Module on the login page.
Here, you can see the entire supplier information
Supplier Statement tab, it shows what transactions the supplier has done and how much the balance is due.

Price Sheet tab in SRM tools

Contact tab in SRM tools


Purchase orders list related to the supplier

Supplier Invoices list related to the supplier

Inventory list related to the supplier

63. Supplier performance metrics
(Ability to keep track of past orders and have some type parameters to keep track of performance of the supplier)
Supplier performance Report :
In SPS go to Setup >> System Settings >> Sales >> Survey Settings
Here, we can add what are the questions displayed in the scorecard page.
Scorecard page for the Supplier performance:
Report for supplier Performance scorecard.
Supplier Part Pricing
77. Supplier RFQ module/management
(Is there a way to send out quote requests to multiple suppliers to compare pricing)
For this we have Pre Purchase request module
Pre Purchase Request Module
In the Pre Purchase request module you can send mails to multiple local suppliers for the inventory availability and you can compare responses from them and can create purchase orders from their responses.
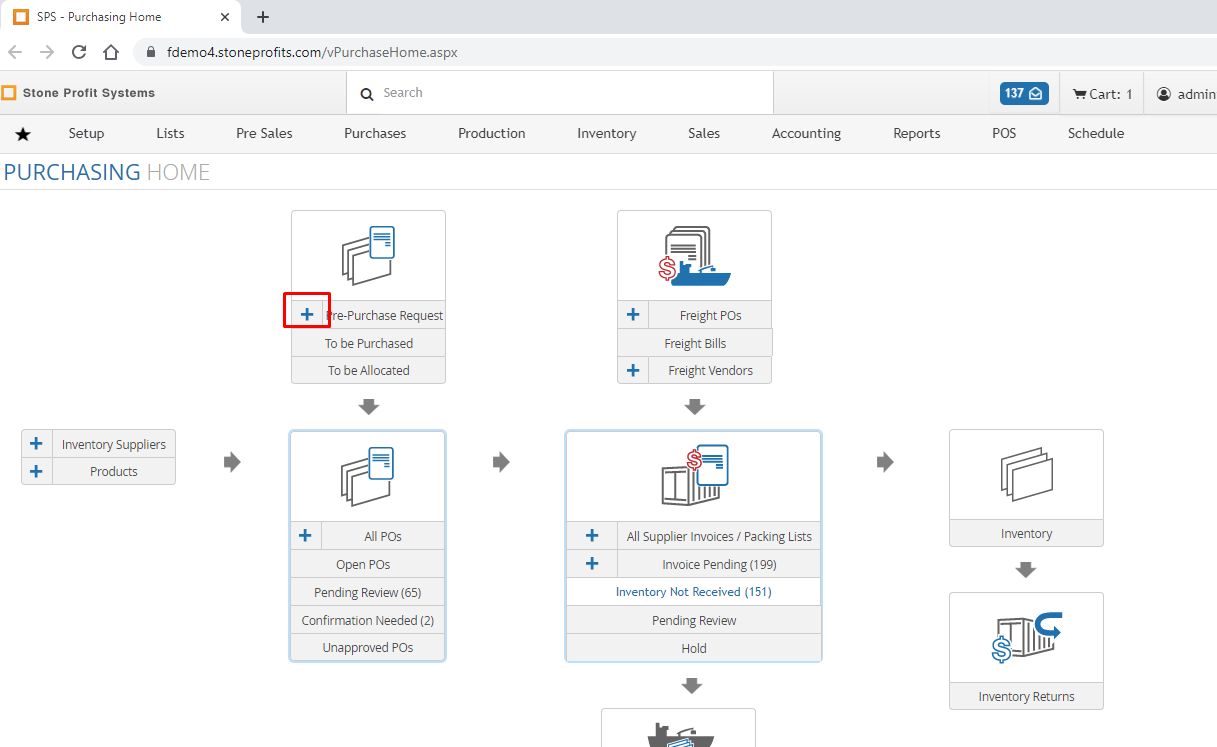
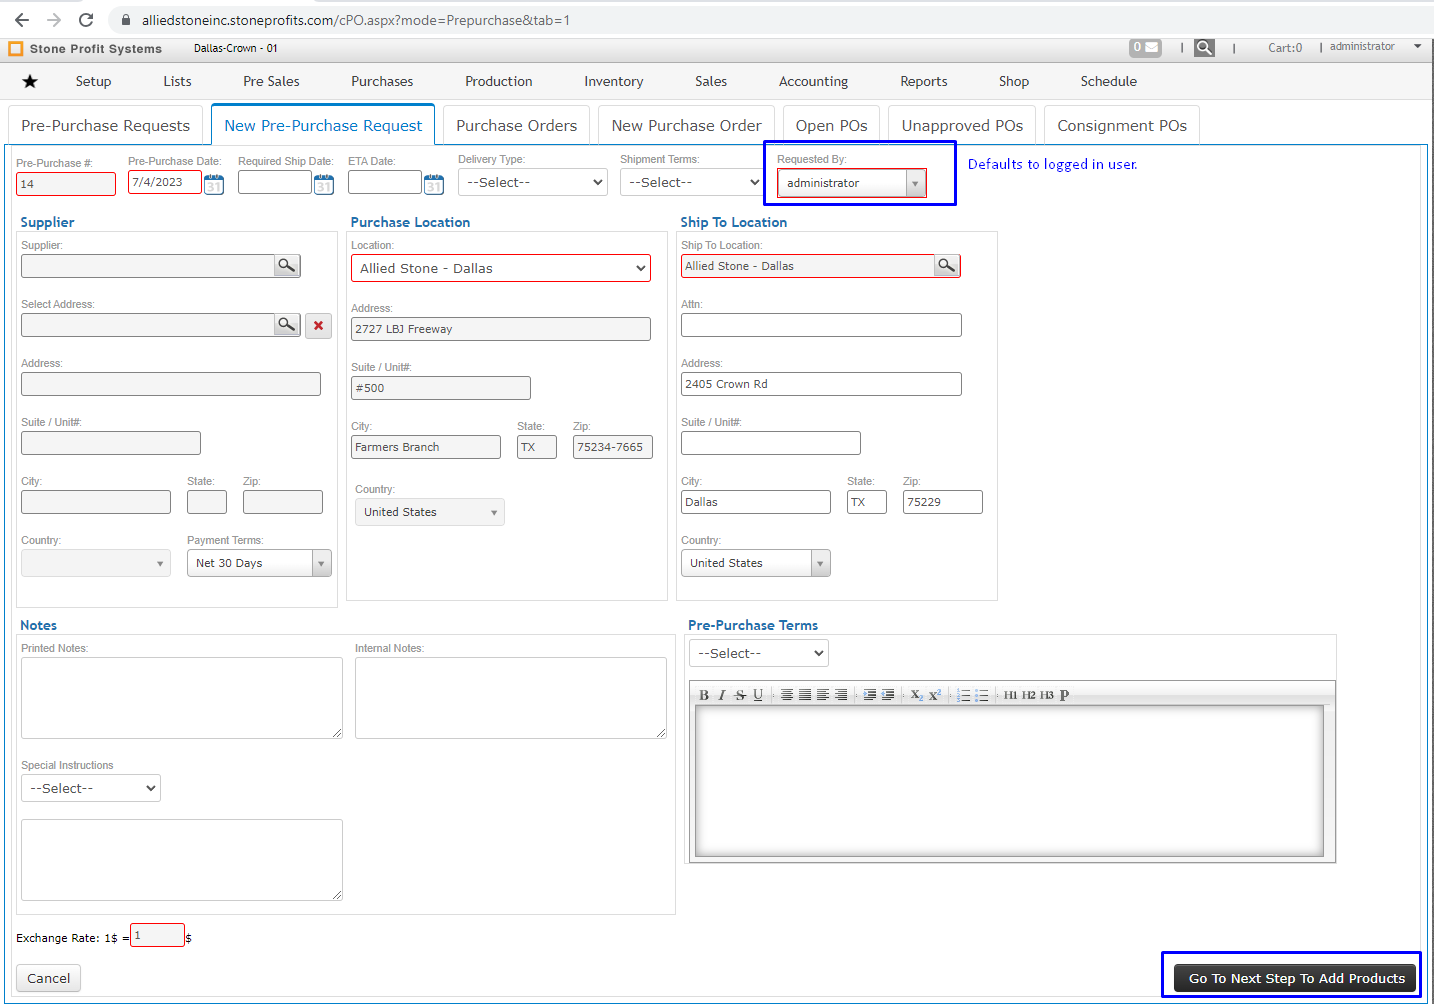
Create Pre Purchase request

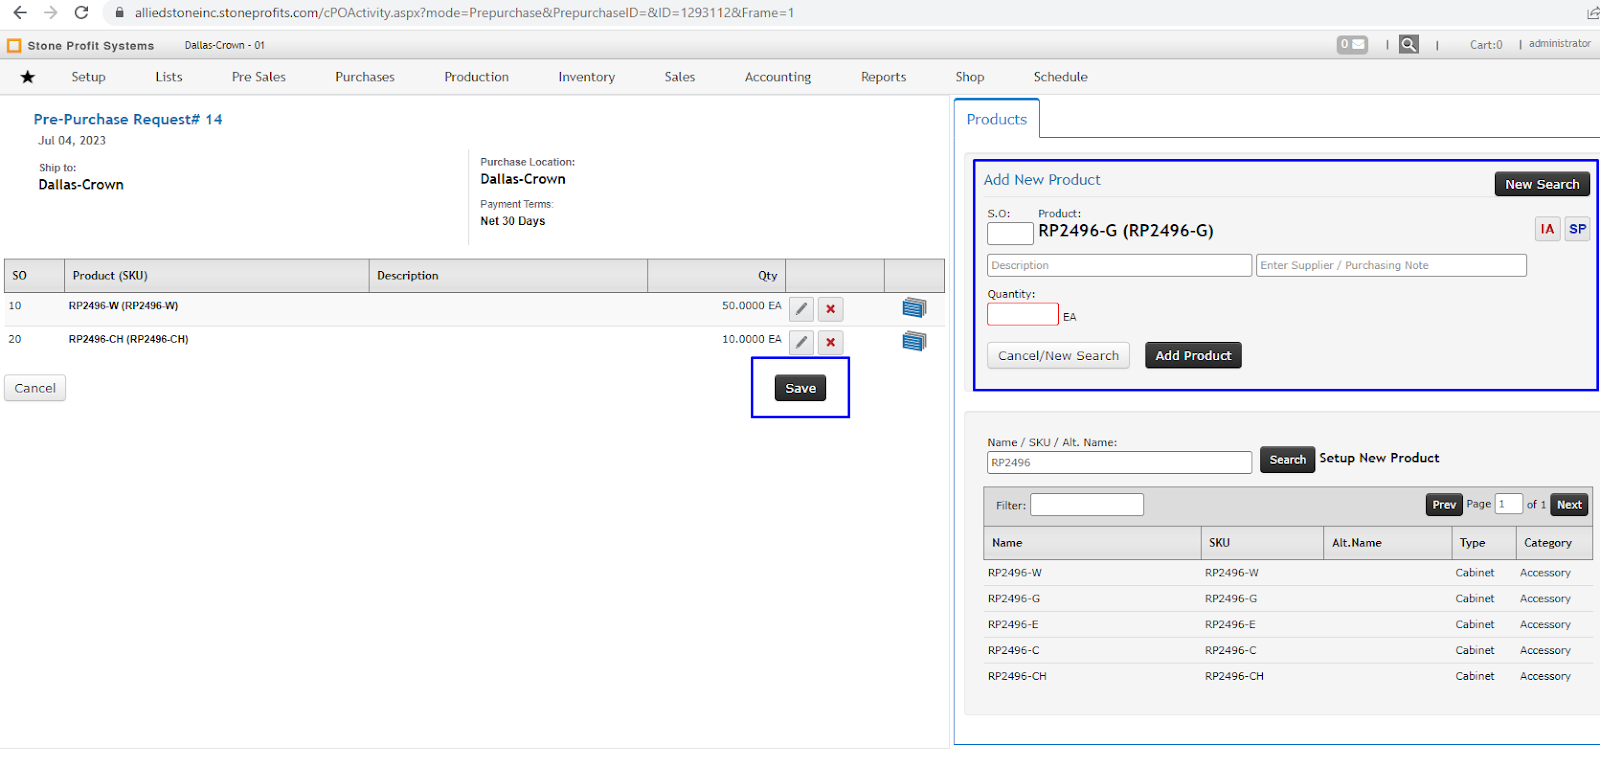
Here you can add the products that you want to purchase.

From this screen you can send requests to multiple vendors through email.
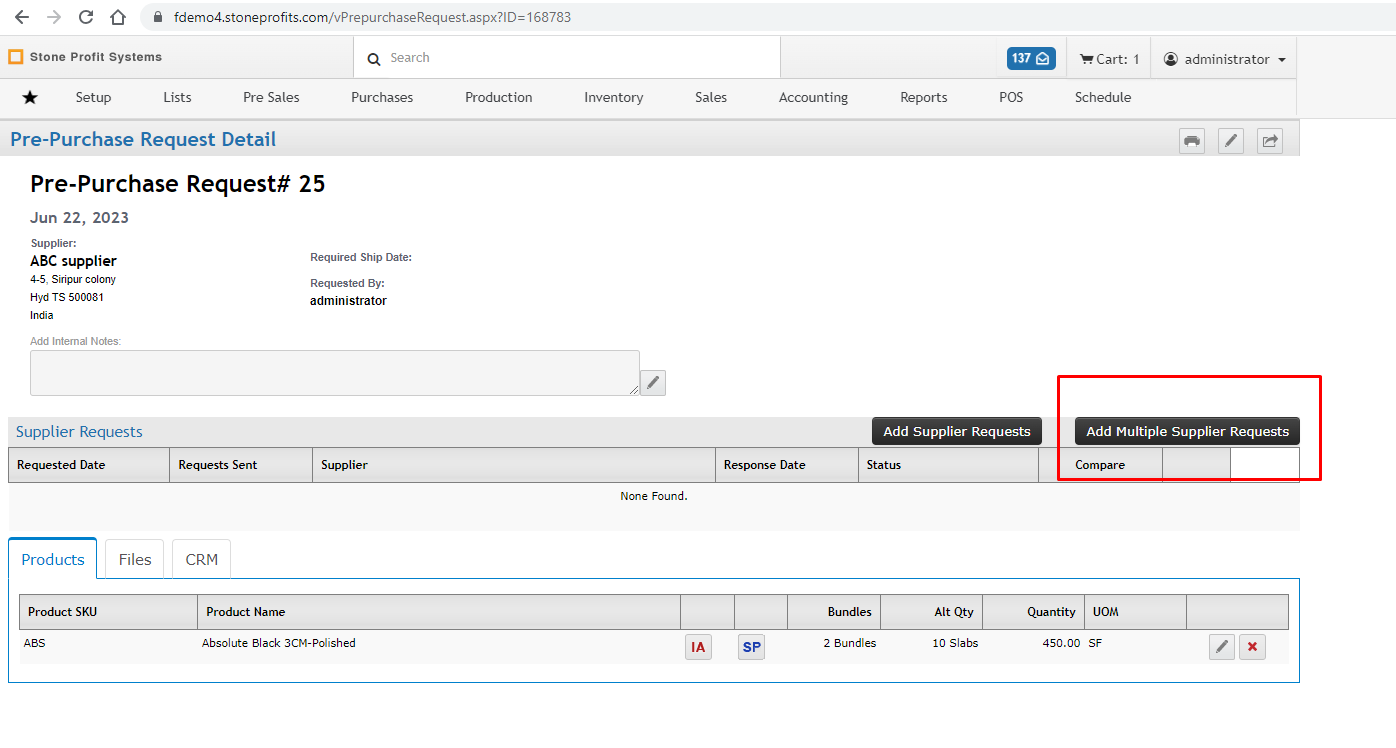
From the right side you can select multiple vendors to send requests.

When selecting suppliers, all contacts will appear on the screen
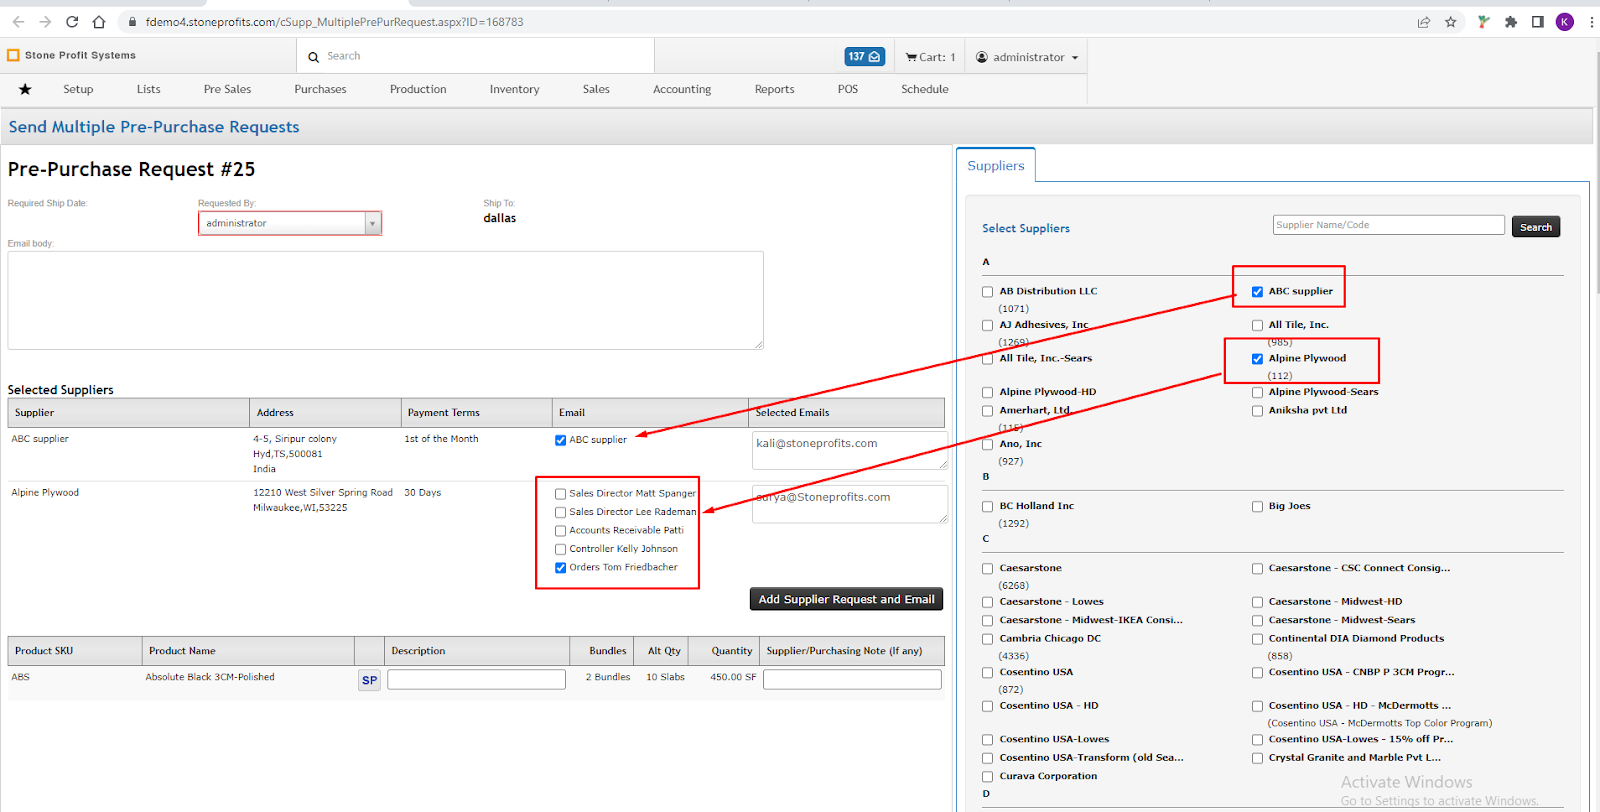
You can select contact, related emails will be filled in the Selected Emails box and when creating requests, mails will be sent to that supplier.
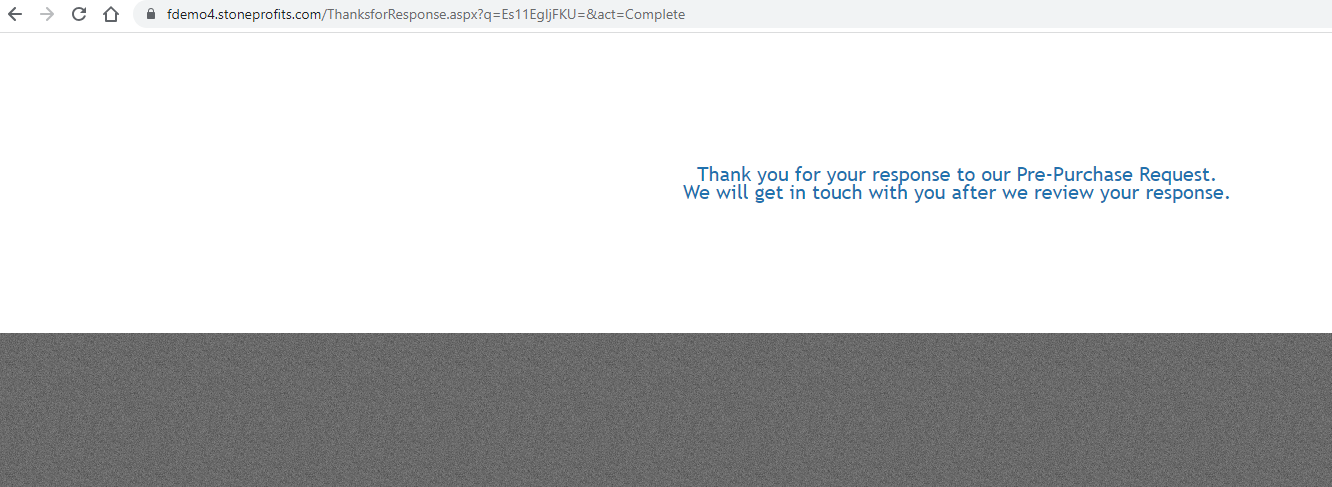
Supplier will have this mail. They can reply from the mail.


It will show instructions for suppliers on how to fill.
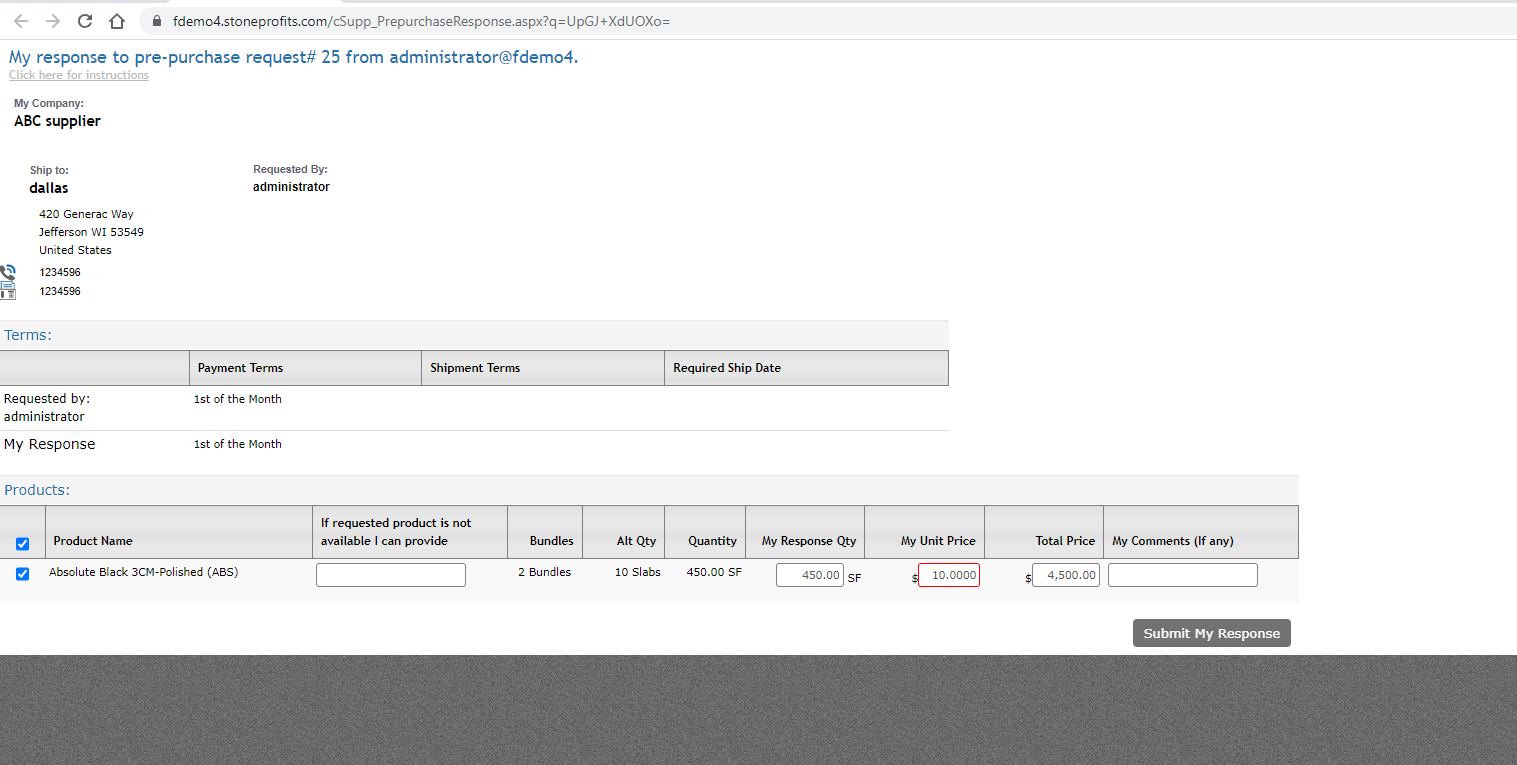
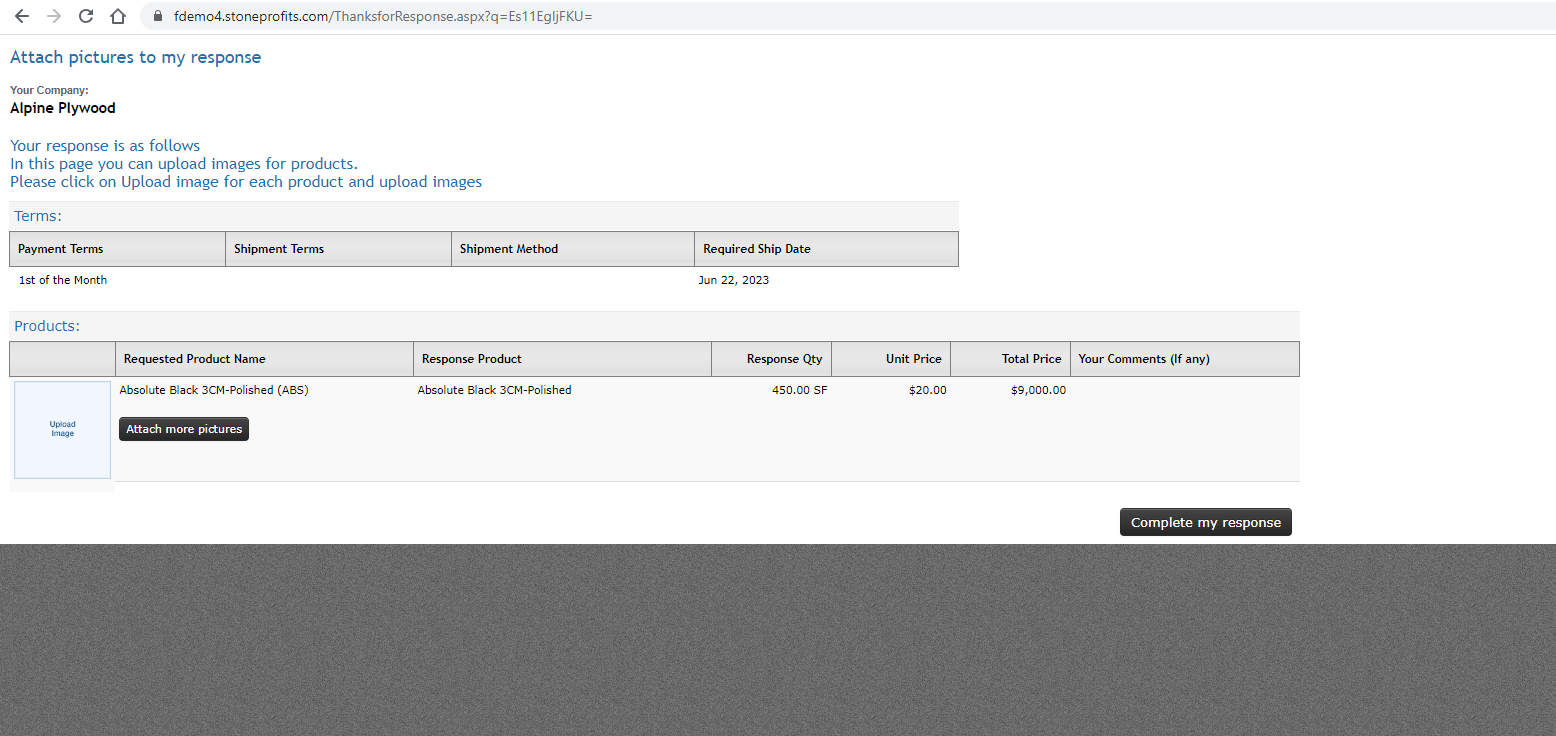
They can attach pictures if they have

If you want to update any response of the suppliers you can also update.

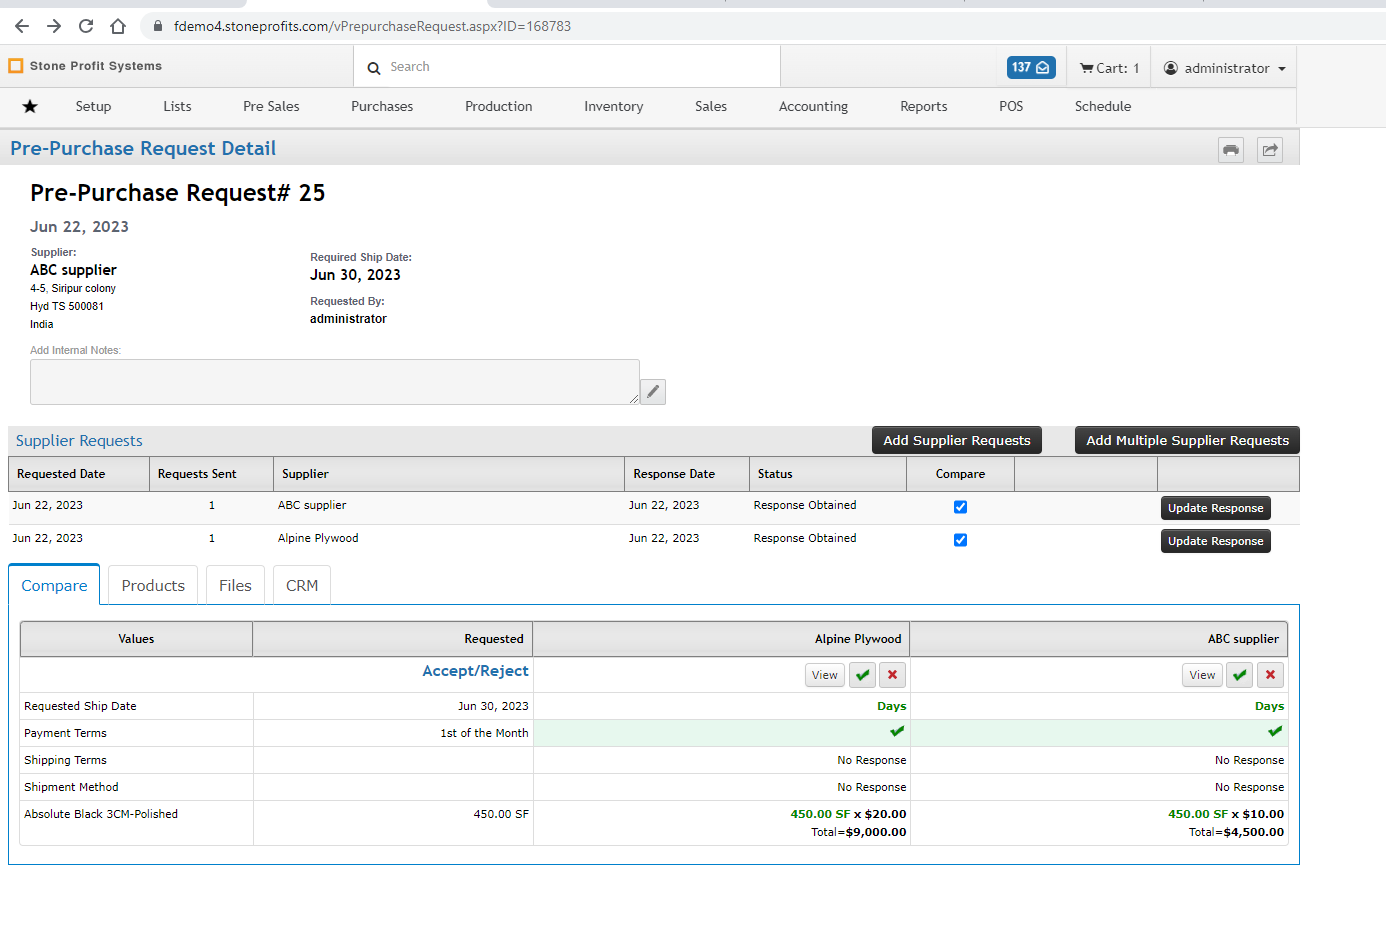
You can compare supplier’s responses and accept one of the responses.

By clicking on tick mark you can accept the supplier’s deal and clicking on x mark you can reject
the response.

You will have to add a purchase order button once you accept the supplier response.

Material Receiving
80. RMA Information
(Easy ability for receiving at dockside to fill out quality information to be able to kick off the return material authorization process.)
We will give another transaction called Return Requests, which will require you to create one more transaction before doing the actual inventory return.
Some from the Inventory Management side will create Return Request and send it for approval
Authorized person will approve the return request
After approval of the return request, someone will create the actual Inventory Return.
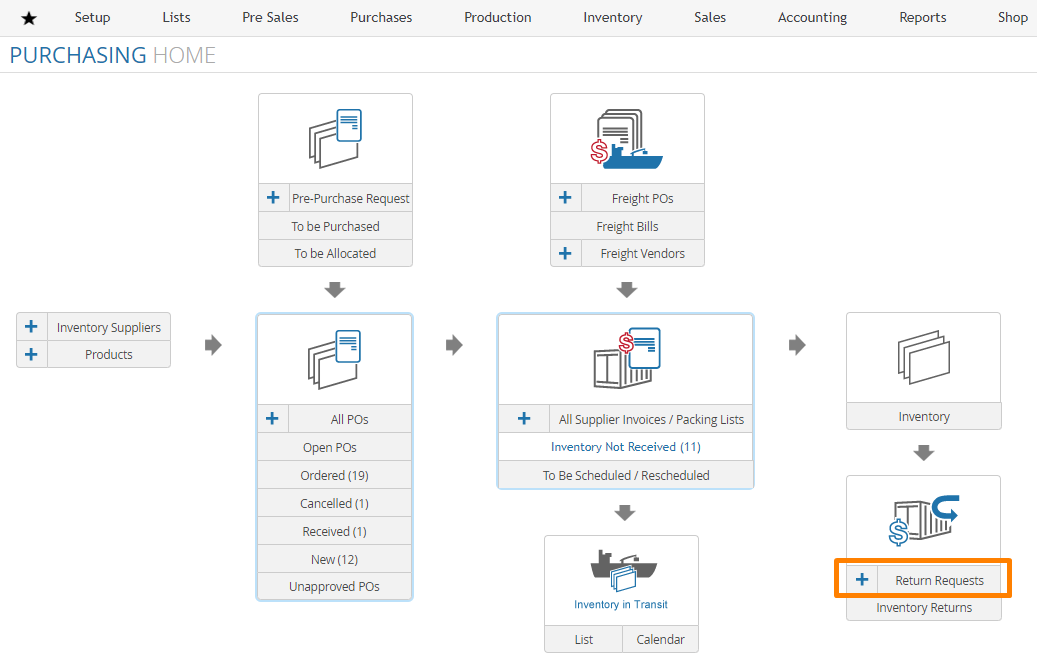

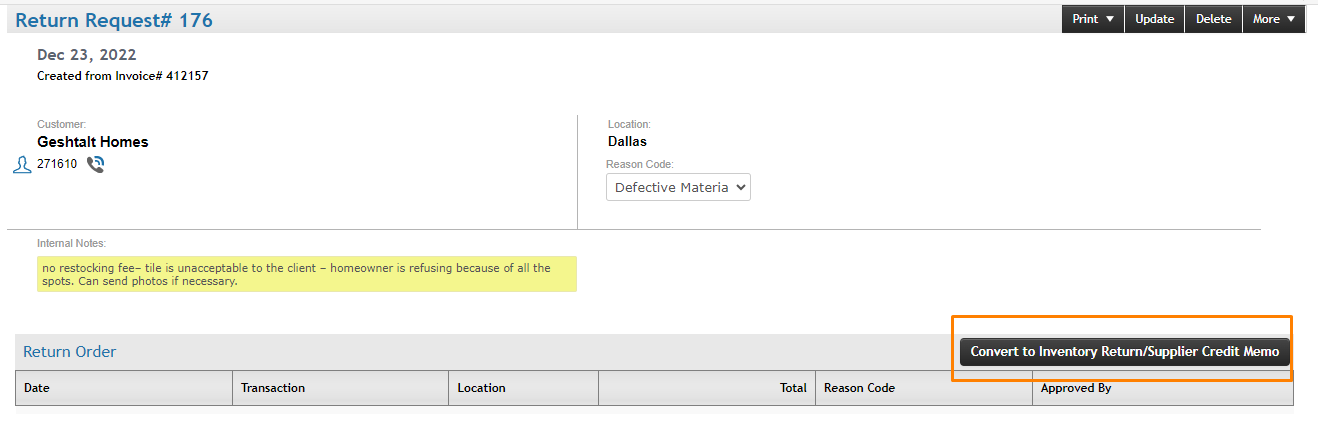
When you click Add Return Request, it will take you to the create New Return Request page.
You can select the Reason Code
Select the slabs that you want to return.
Create Return Request

We will show the list of Return Requests, you can filter down by Open or Closed or All.

By going to each Return Request you can convert it to actual Inventory Return.
81. Mobile Receiving
(Ability to receive with mobile device, 3 way match and the function needs to work with minimal user input)
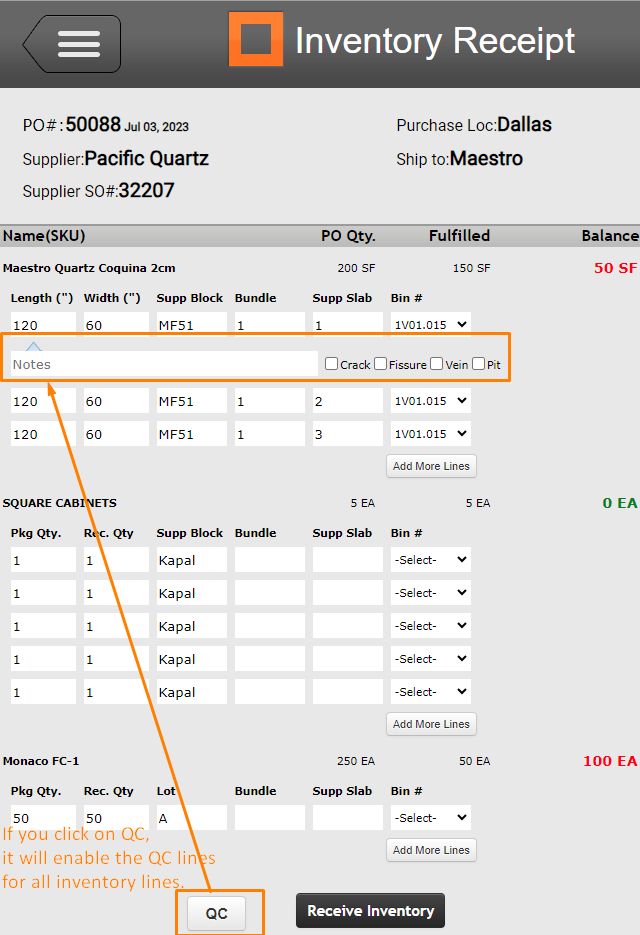
PO Qty: Quantity in PO
Fulfilled Qty: it will show the sum of the already received quantity against other inventory receipt + current entered quantity.
Balance Qty: PO Qty - Fulfilled Qty

83. What happens if the material fails inspection?
(Does SPS have a workflow to accoumandate such busness practice)
After QC is done, we show the QC information in the packing list.
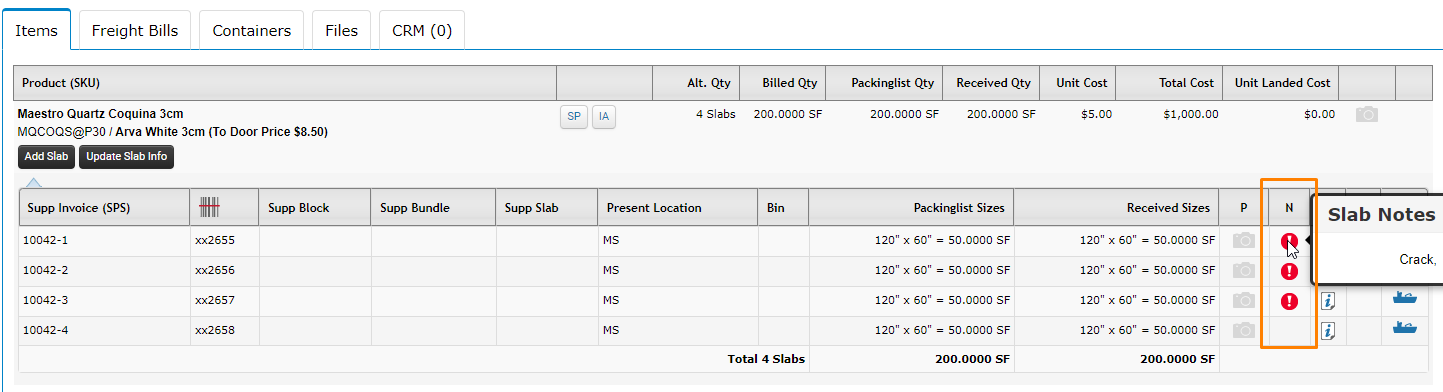
We also provide the report to see all the Supplier Invoices QC information by SIPL and item wise.

From this report, you can go to each transaction which has failed in QC and create the return request or direct return.
85. Material Receiving Checklists - Configurable by Part / Customer part?
(A checklist of sizes or items in a box to look over before a part os received, Veining, mirroring, fissures, oddities in stone, etc)
QC in Main Module:
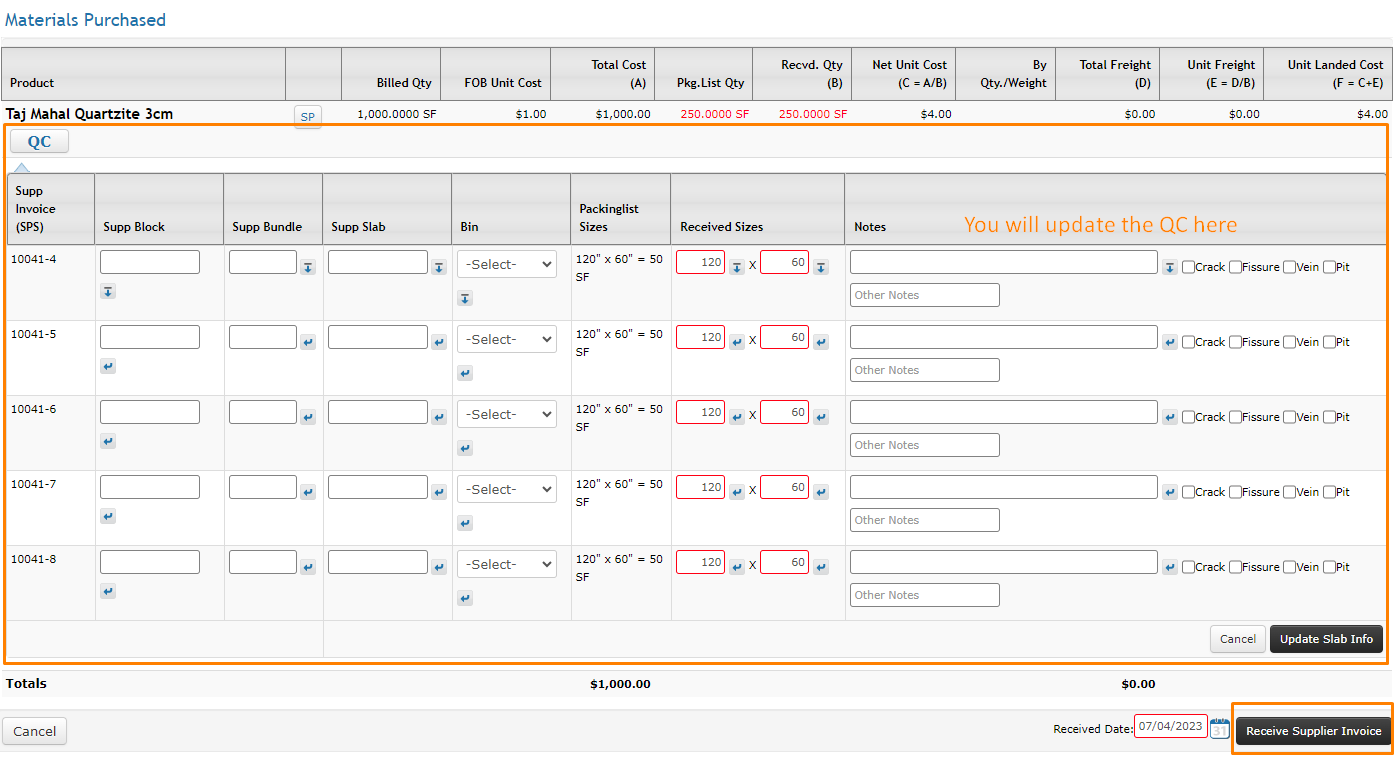
After you enter the Packing List details, once you click on receive inventory. We will give the option to do the QC and then receive the inventory.
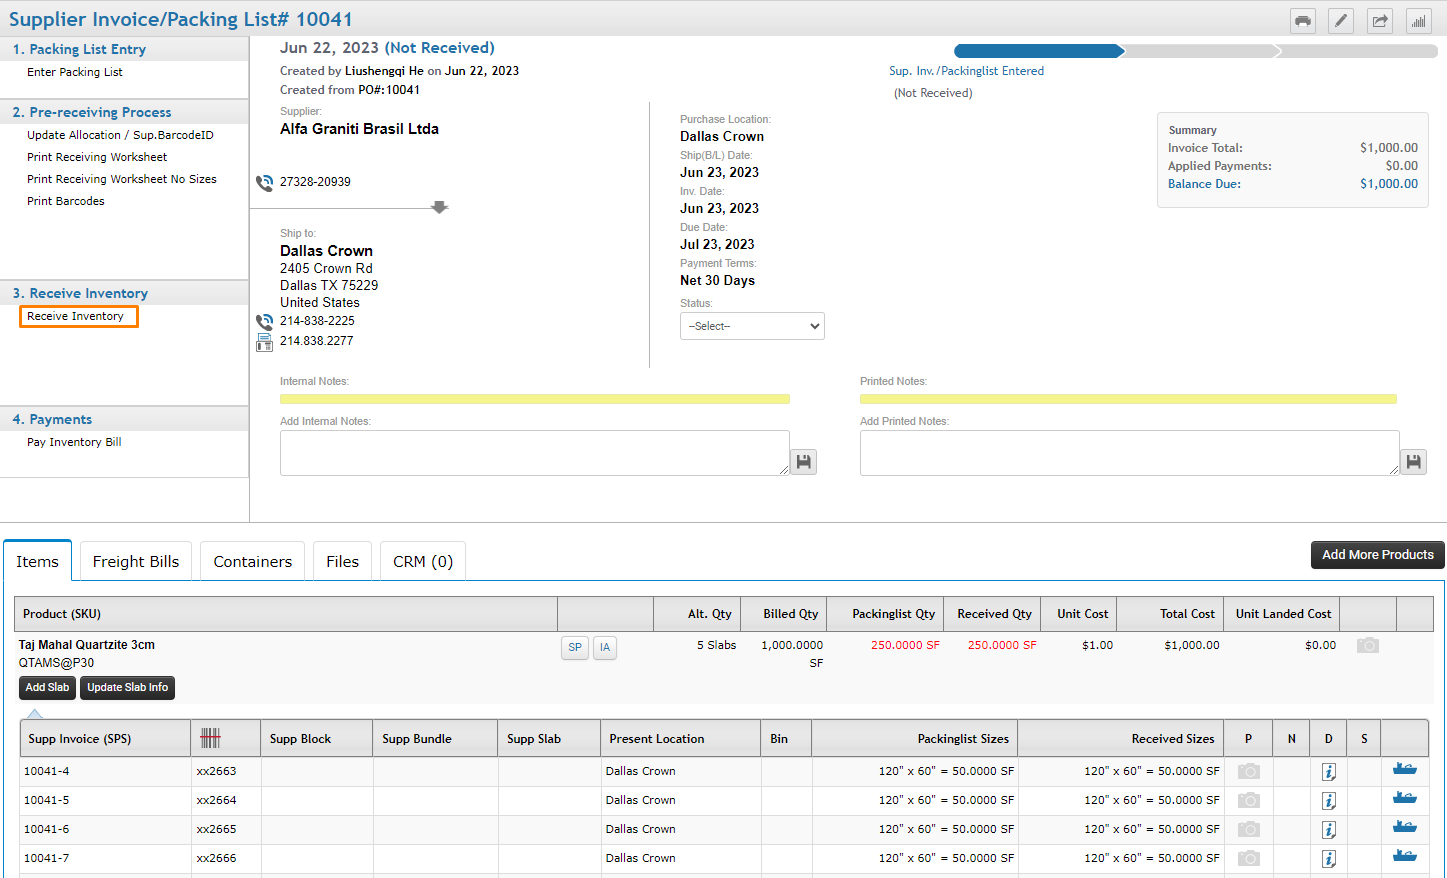
As shown below, we will add the section to do the QC. After you are done with your QC, you can receive the inventory.
QC in Mobile Version:
QC options can be defined from the System Settings.

86. Receive by lot / heat information
(Ability to receive a lot of sinks, at a 250 qty, which allows for the transaction of those 250 sinks, to include the lot)


87. Scanning to Receive
(Ability to receive on a mobile terminal, seek best solution for label workflow Vendor portal?)
Setup Item barcodes in the System Setup
Setup >> System settings >>Barcode >>Barcode Setup - Item


Can generate Non Serialized Item barcodes either based on SKU or ItemID
ability to select the parameters that you want to print on barcode

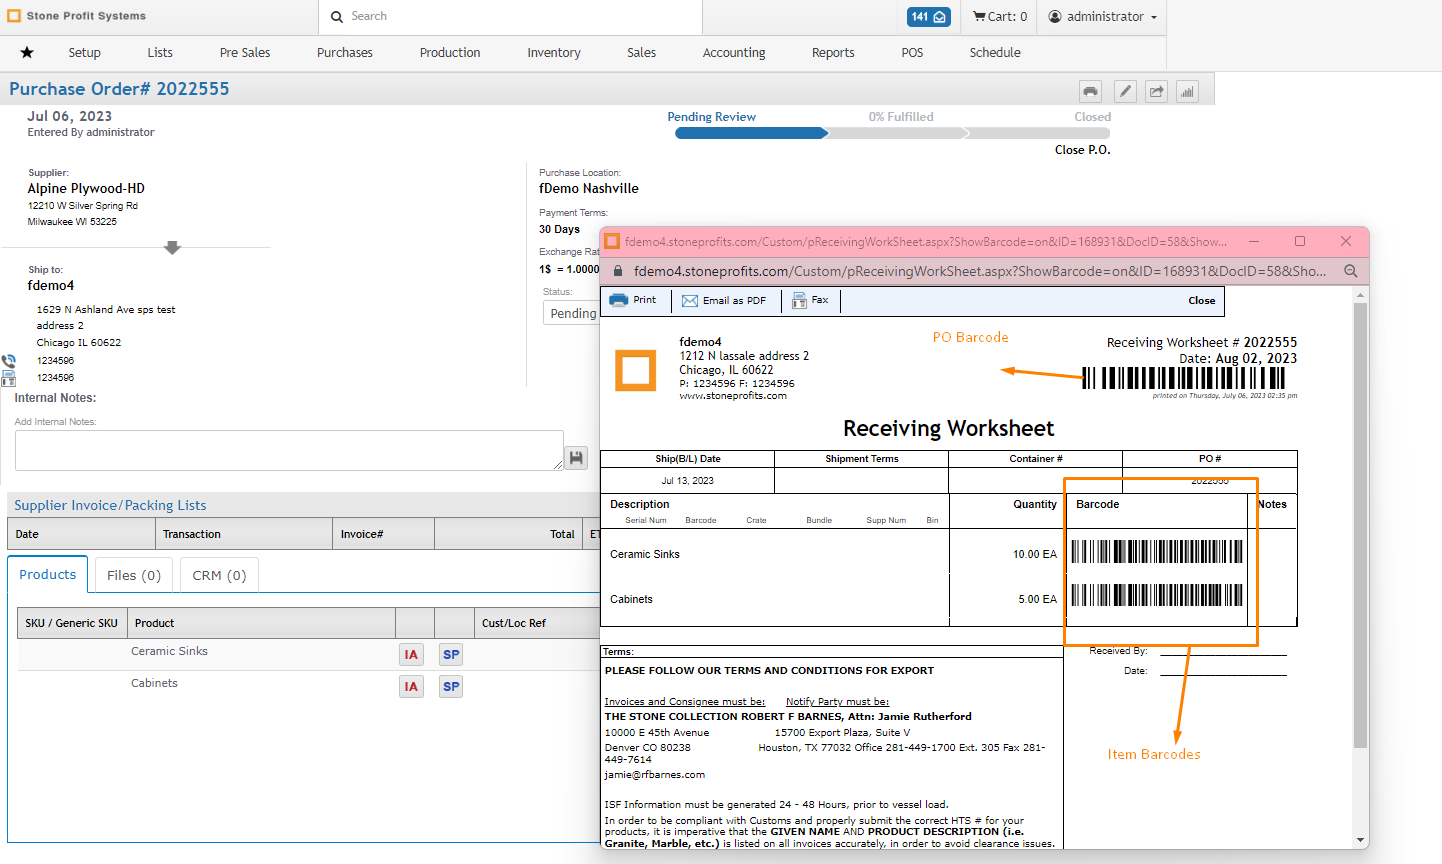
View Purchase Order
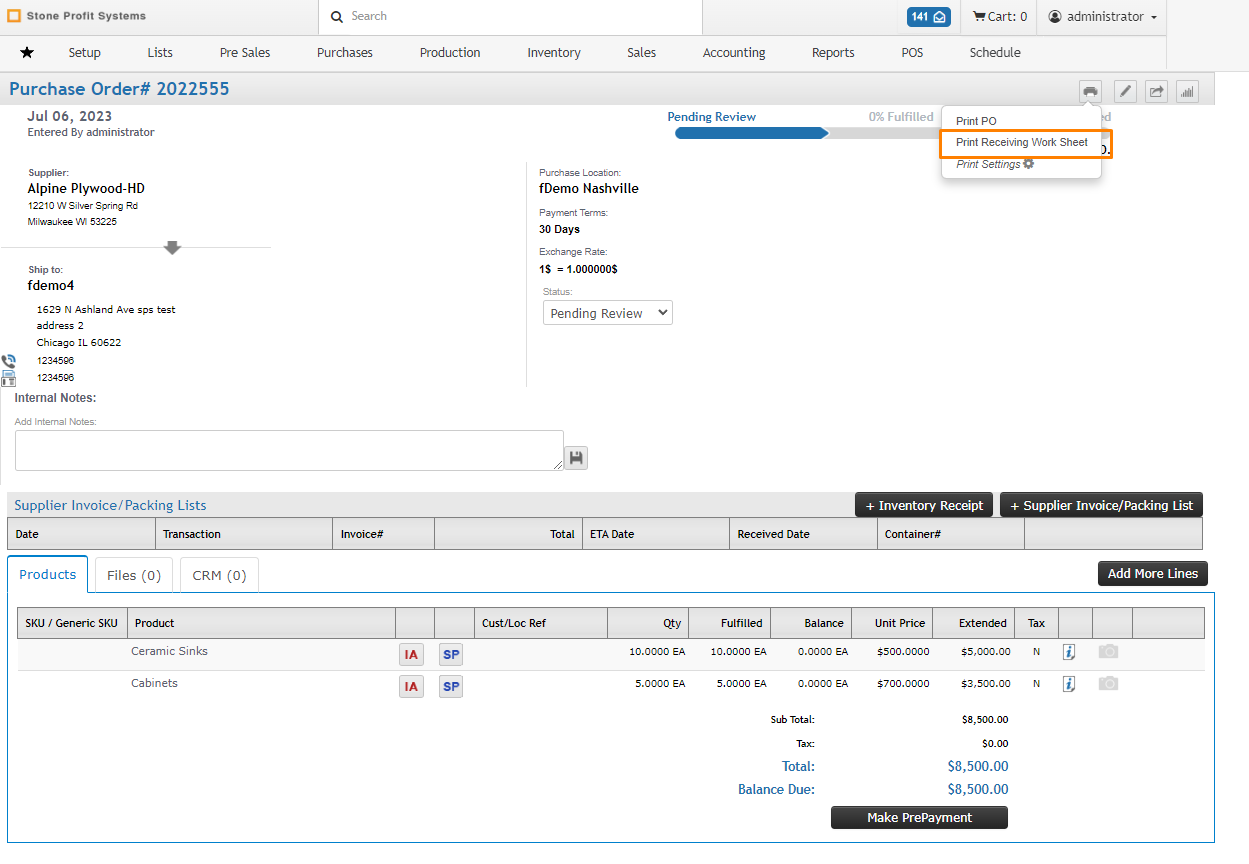
Print Receiving Worksheet will show all the items with the Barcodes
From the Mobile version we will give the option to Receive the Inventory.

When you click on Receive Inventory PO, it will ask you to scan or input the PO number.

As soon as PO Number is scanned, it will ask you to scan the Item to enter Quantity

Once you scan Item Barcode it will ask you to enter quantity

Enter Quantity and click on add button, you can receive all the non serial items by scanning the item barcode

Once you scan all the items, click on Receive Inventory to create Inventory receipt in the system.

87. Mobile menus for supply receiving and serial receiving
While receiving the inventory, for example if you want to receive the 250 qty of sink inventory into different lots then, you will enter the first lot with its qty in the first line. For to enter the remaining lots you will click on Add More Lines.


Inter-Plant Shipments
Use of 3rd parties for inter-plant shipping/transfers
Ability to keep track of transportation cost during inventory transfer?
We can give the following option to enter Delivery charges

If you want to change or enter other charges you can enter in receiving stage as well

Unit Freight will be calculated based on Quantity

And Freight value distributed towards all the items.

Dr Inventory will include Service Charges